HuntDocs Help & Support
Official step-by-step instructions and videos for every HuntDocs feature.
Question about your specific account? Email [email protected].
Complete Your Profile
Set up your outfitter information so it appears on invoices, emails, and documents automatically.
- Click Your Profile Icon — In the top navigation bar (top right).
- Select "Profile" — Open your profile settings page.
- Upload Your Logo — Brand your invoices, waivers, and client emails.
- Add Your Business Information — Enter your address, phone, and optional licensing info.
- Set Your Invoice Email — The contact address shown on your invoices and billing emails.
- Save Changes — Click the Save button to update your profile.
Configure Your Settings
Personalize your HuntDocs system by choosing which species, features, and dashboard elements are active.
- Click Your Profile Icon — In the top navigation bar (top right).
- Select "Settings" — Open your system configuration page.
- Select the Species You Offer — Choose which game species appear in your hunts and client filters.
- Customize Your Dashboard — Turn dashboard cards on or off based on what you want to track.
- Activate Feature Modules — Enable options like Travel Info, Camps & Lodging, Additional Services, and the Staff Module.
- Save Your Settings — Click Save to apply your changes across HuntDocs.
Your Dashboard: Your Business and My Day
The Dashboard answers two questions every morning: where does my business stand, and what do I need to do today? The Your Business card is the first. My Day, right below it, is the second. Every number on the card opens the people behind it, and every line under My Day comes with the thing to click.
The Your Business Card
Four numbers, left to right, in the order a client moves through your business. Hover a number and it turns orange; click it to see the people.
- Contacts — People you're actually working: anyone you've marked as talking, logged a call or email with, set a task for, or who came to you directly (a form, a text, a show lead you flagged to follow up). A bulk-uploaded mailing list doesn't count until you touch someone on it. Under the number: N need a next task — contacts with nothing scheduled.
- Booked — Trips ahead: every upcoming booking with a hunt or dates on it. Under the number: N with no booking package sent (HuntDocs never emailed them a package — open the client and click Edit & Resend Booking if they need one) and N trips ahead with no payment recorded (no payment on file in HuntDocs for the trip — open the list and click Record a payment to key in a check, cash, or a card you ran elsewhere).
- Confirming — People who still need to sign: anyone you've sent a Smart Form or document for signature that hasn't been signed, whether you sent it from their record or from a booking. Gear lists and itineraries don't count. Under the number: N being reminded automatically when Auto-Reminders are chasing documents for them, or Turn on auto-reminders if the switch is off, and N can't be reached for anyone with no email or cell on file, or whose last email bounced.
- Hunted — Past clients. Under the number: N to thank — clients whose trip ended in the last two months and haven't been thanked yet (see Saying Thank You below).
The numbers say what HuntDocs has on record. "No payment recorded" means no payment is keyed in, not that the client owes you. Record what you've collected and the number drops.
My Day
Today's list, for the person signed in. Each section is capped at five with an …and N more link so it stays a list, not an archive.
- Needs your signature — Documents waiting for your counter-signature, with Counter-sign now and a link to completed Smart Forms.
- Needs attention — Things only you can handle: a trip starting within a week where the client still needs to sign or no payment is recorded, money parked on a cancelled booking, a guide who hasn't confirmed an assignment, a staff invoice waiting for review, a guide license or certification expiring within 30 days, an overbooked hunt, or a client text nobody has answered. Every line has its action. The × dismisses a line for everyone on your account; it comes back if the underlying fact changes. Parked money can't be dismissed, only resolved.
- Overdue and Due Today — Your tasks. Tick the box to mark one done; the row stays with an Undo in case you didn't mean it. All tasks opens the full list.
- New leads — nobody has reached out — Contacts added in the last two weeks that nobody has logged a touch with yet.
- Coming up for your people — Birthdays and special days inside the next two weeks. Birthdays fill in on their own from a client's date of birth, and a first-hunt anniversary from their first trip; add anything else on the client's record. Each row offers Send a text, Send an email, Set a task, or Skip. One-time dates offer a task only.
- Handled for you this week — How many payment and document reminders Auto-Reminders sent, so you know what the system already chased.
Every morning your list isn't empty, HuntDocs emails it to you.
Send and Add a Task
The two buttons above the card. Send asks who first — a client, contact, or staff member — then offers Email, Text, or Smart Form for that person (a dashboard message for staff). Emails go out with your logo and business name and are logged on the person's Messages tab. Add a Task takes what, a type, when, and optionally who it's about; a task can be about nobody at all, like ordering supplies.
Tasks
- On a client or contact's record — The Tasks card shows what's scheduled and the history; on a client's record the next step also shows in the header. When you tick off the last open task, HuntDocs asks Set the next task for [name]? so nothing slips; Not now closes it.
- On the Contacts and Client lists — The Next step column shows each person's next task with its date and the one thing to do; tick it done right there (with Undo), or click Set a task when there's nothing scheduled. On Contacts, the Due Today, Overdue, and No Next Task buttons filter by it, and All tasks → at the right opens the full list.
- All Tasks — Everything open, by due date, with done history below. Administrators can view anyone's list or everyone's. Each row shows the one thing to do for its type: the phone number to tap for a call, Send an email or Send a text that opens the Send box with the person already picked, or a note like No email on file that opens the record so you can add it.
Saying Thank You
- Click N to thank under Hunted. Each client's most recent finished trip is listed.
- Send an email or Send a text — A short thank-you is pre-written with their first name and your business name; edit it and click Send now. It's logged on their record.
- Set a follow-up — Right after the send, HuntDocs offers a follow-up to bring them back: in a month, three months, six months, or a date you pick. The row then tells you the task's date and that it lives under All Tasks. Skip clears a row without sending anything.
Important Notes
- Getting Started stays on top until you close it, and the Booking & Scheduling strip, left sidebar, and top navigation are unchanged. Hunts Available and Day Use Forecast still show below the card if you have them turned on in Settings.
- The old booked-hunt counts, Documents card, and Staff Tasks card are replaced by the Your Business card and My Day. Counter-signing and completed Smart Forms moved to Needs your signature; staff invoices waiting on you appear under Needs attention.
- Nothing here sends on its own — every email and text from the Dashboard is one you write and click. Auto-Reminders keep running as before; the card and My Day just tell you what they've handled.
Add a New Client
Create a client record to start managing their trips, documents, invoices, and communications.
- Click "Clients" → "Client List" — Open your list of all clients.
- Click the Orange "+" Button — At the top of the Client List, next to the search bar. (You can also use "Clients" → "Add Client" in the menu.)
- Enter Their Details — First name, last name, and their email and phone if you have them.
- Save — The client appears in your Client List, ready to book.
- Send an Invite (Optional) — From the client's row, open the Actions menu and choose "Invite (Email)" or "Invite (Text)" to invite them to confirm their information.
Edit a Client's Information
Update a client's personal information, contact details, or notes whenever needed.
- Click "Clients" → "Client List" — Open the list of clients.
- Open the Client's Record — Use the Actions menu on their row and choose "Edit."
- Open the "Basic Information" Section — The client's page is organized into sections; Basic Information holds their name, contact info, and address.
- Update and Save — Make your changes and click "Save."
Upload Contact List
Bring a bulk list of contacts into HuntDocs from an existing spreadsheet.
- Open "Contacts" — From the left-hand menu, then click the "Upload Contacts" button.
- Download the Template — Click "Download Excel Template." Don't change the header row — one person per line.
- Fill In Your List and Save as CSV — In Excel, click File → Save As and choose CSV (Comma delimited). A Google Sheet exported as CSV with the same headers works too.
- Upload and Preview — Select the file, click "Preview Import" to review what will be created, then confirm the import.
Contacts: Track Your Leads and Prospects
Contacts are the people who aren't clients yet — show inquiries, referrals, waitlist names, form fill-outs. The Contact List is your follow-up pipeline: every lead, when you last talked, and who's due for a call, so nobody interested ever falls through the cracks.
Working the List
- Open "Contacts" — From the left-hand menu.
- Read the pipeline at a glance — Each contact shows their status, when they were last contacted, their Next step (the next open task, with its date and the thing to do), owner, lists, and interests.
- Use the quick filters — Due Today, Overdue, My Leads, and No Next Task turn the list into today's call sheet. All tasks → at the right opens every task.
- Do the next step from the row — Tick the task done (with Undo), tap the number to call, or Send an email / Send a text with the person already picked. When nothing is scheduled the cell says Set a task. After a call or email, use Log Engagement on their record and HuntDocs asks for the next task if nothing is scheduled.
- Add people — One at a time with Add Contact, or in bulk with Upload Contacts (see that topic above).
When a Contact Books
Book them like anyone else — search their name in Trip Builder. HuntDocs converts the contact into a client and brings their history along; you never re-enter their information.
Important Notes
- Contacts feed from your marketing too — the public contact form and event QR codes create contacts automatically (see Marketing Assets).
- Lists work here — group contacts for bulk email exactly like clients (see How to Use Lists).
Understand the Hunter Readiness List
The Hunter Readiness List shows which clients are fully prepared for their upcoming trip based on signed contracts, waivers, camp assignments, and payments.
- Open "Clients" → "Hunter Readiness List" — From the left-hand menu.
- Choose What to Track — In Settings, the Hunter Readiness Checklist card controls which items appear: contracts, waivers, balance due, and more. You can also check any of your own SmartForms there — each tracked form counts toward readiness once the client completes it.
- See What's Missing — View unmet requirements like unsigned waivers, unpaid balances, or unassigned camps. Tracked SmartForms show in one Forms column ("1 of 3"), with the missing forms listed by name.
- Click Through to the Client — Drill down into any row to see their full record.
- Take Action — Follow up on whatever is missing — send the document, request the payment, or assign the camp.
The Client Portal: What Your Clients Can Log In and See
Clients with a login get their own portal — their trips, their invoices, their documents, and a Pay Balance button — so "can you resend that?" answers itself. Logins are optional: everything you send (signing links, pay links) works without one.
Inviting a Client
- Open "Clients" → "Client List"
- Use the row's Actions menu — Choose "Invite (Email)" or "Invite (Text)." They get a link to set up their account.
Inside Their Portal
- My Trips — Upcoming and past trips, each with View Invoice, Pay Balance, Complete Documents, and directions to the meeting spot.
- Group trip invoices — A client who's the payer for a group trip also sees the group's invoice, with the balance and a Pay Online button.
- Messages — Notes you've sent them.
- Documents — Their signed paperwork, plus the ability to upload documents to you (licenses, insurance cards).
- My Information — Their contact details, and a photo gallery.
Group Organizers Are Different — and Easier
The organizer of a group trip doesn't need a login at all. Their booking email carries a personal link to the group dashboard, where they track everyone's documents and payments — and set who pays, on trips using Assign Payers.
Important Notes
- No login required to sign or pay — signing requests and pay links work straight from email. The portal is convenience, not a gate.
- A client who can't log in — email [email protected] and we'll straighten out their account.
Duplicate Records: Combine Two Records into One Person
Sometimes the same person ends up in your account twice — once as a contact from an inquiry, once as a client from a booking. HuntDocs spots likely duplicates and asks you a simple question: are these the same person? Say yes, and it combines them into one clean record without losing anything.
Resolving Duplicates
- Follow the notification — The bell tells you when possible duplicates are found; there's also a "Resolve duplicate records" link on your Client List.
- Answer the question — Each pair shows both records side by side: Same person or Not the same person.
- Pick the right details — Where the two records disagree (two phone numbers, two emails), you choose which value wins, field by field. Nothing is chosen for you silently.
- Combine — One record remains, holding everything: trips, payments, documents, and history from both.
Important Notes
- Combining is undoable — Recently combined pairs are listed with an Undo that restores both records exactly as they were.
- "Not the same person" is remembered — dismissed pairs stop being suggested. Use Reconsider if you change your mind.
- Sharing an email doesn't make two people one — a father and son on one email address are two records, and HuntDocs never combines anyone automatically. You always make the call.
Notes & Reminders: Your Scratchpad on Every Page
The Notes & Reminders drawer is the notepad that follows you around HuntDocs — jot a to-do mid-task without leaving the page you're on, and it's waiting wherever you open the drawer next.
Using It
- Open the drawer — Click Notes & Reminders in the top bar (or the menu on mobile), from any page.
- Jot it down — Reminders, to-dos, phone messages — anything you'd otherwise scribble on paper.
- Check notifications there too — The drawer shows your notifications with All / Unread views and a mark-all-read.
Important Notes
- Notes about a specific client belong on their record — the Notes section of the client's page keeps them with the person (and your team can see them there).
- The drawer is yours — clients never see it.
Add Travel Information for a Client
Collect arrival and departure details to organize transportation and logistics for your clients.
- Open the Client's Record — Go to "Clients" → "Client List" and open the client from the Actions menu.
- Open the "Travel Information" Section — On the client's page. (Turn on the Travel Info module in Settings if you don't see it.)
- Enter Travel Details — Arrival and departure times, transportation, airline, flight number, and any notes. You choose which travel fields appear from your Settings.
- Save — Click "Save Travel Information." Use "Print Travel Itinerary" for a printable copy.
Book a Trip for an Existing Client
Booking happens in Trip Builder — for new and returning clients alike. It tracks dates, payments, and details across the system.
- Open Trip Builder — Click "Book A Hunt or Trip" in the Booking & Scheduling strip at the top of any page.
- Add Your Client — Click Add Client and search for them by name. Their record, contact info, and any deposits on file come with them.
- Add the Hunt — Click Add Hunt and pick the offering, or create a new one right there.
- Book It — Use Book & Send to book and email the confirmation, or Book & View Client to book quietly. See the Book a Hunt or Trip (Trip Builder) topic for every option.
- Changing an Existing Booking — On the client's page, open the trip card in Booked Hunts and click "Edit & Resend Booking Email" to reopen it in Trip Builder.
Apply a Discount or Adjust a Trip's Price
Give a discount on a client's booked trip to adjust their invoice and balance.
- Open the Client's Record — Go to "Clients" → "Client List" and open the client from the Actions menu.
- Open the "Booked Hunts" Section — Find the trip card.
- Click "Apply Discount" — At the bottom of the trip card. Enter the discount amount and an optional note.
- Save — The invoice and balance update automatically.
- Changing the Price Itself — To change the trip's price (not discount it), click "Edit & Resend Booking Email" on the trip card and update the price in Trip Builder.
Assign a Camp or Lodging to a Trip
Assign clients to specific camps or lodging locations for better season management.
- Open the Client's Record — Go to "Clients" → "Client List" and open the client from the Actions menu.
- Open the "Booked Hunts" Section — Find the trip card.
- Find "Camp / Lodging" in the STATUS List — At the bottom of the trip card, click "Assign" (or "Change" if one is already set).
- Pick a Camp and Save — Choose from your saved camps. The assignment shows right on the trip card.
Set Up Your Camps
Create each of your camps once — name, capacity, location, meeting time — and they're ready to assign to any trip, filter any calendar, and hand clients directions automatically.
Adding a Camp
- Open "Hunts" → "Camps & Lodging" — Your camp list.
- Click "Add Camp" — Name it and set the hunter capacity and camp type.
- Add the Location — Street address, or latitude/longitude for camps that don't have one. This powers the directions your clients get.
- Set the Meeting Date and Time (Optional) — Camps with a meeting time pre-fill the meeting details when assigned to a trip.
- Save — Edit or deactivate a camp anytime; marking it inactive hides it without deleting its history.
Where Camps Get Used
- Trip cards — Assign a camp on any booked trip (see Assign a Camp or Lodging below).
- Meeting locations — Camps with a location appear in the meeting-spot picker on trip cards.
- Calendars and filters — The Client Calendar, bulk email audiences, and Scheduled Trips can all filter by camp.
Important Notes
- Rooms and beds are the Lodging module — camps are the places; per-bed lodging management is its own feature. The Lodging Settings link on this page leads there if it's enabled for your account.
Record a Weapon Type for a Trip
Record which weapon the client will be using on their trip — Bow, Rifle, Muzzleloader, Crossbow, Shotgun, or Outfitter Provided.
- Open the Client's Record — Go to "Clients" → "Client List" and open the client from the Actions menu.
- Open the "Booked Hunts" Section — Find the trip card.
- Find "Weapon" in the STATUS List — Click "Select," pick the weapon type, and click "Save."
Record a Deposit or Payment
Record money you've received — a check, cash, or wire — so the client's invoice and balance stay current. (Card and bank-transfer payments made through your payment links record themselves automatically.)
- Open the Client's Record — Go to "Clients" → "Client List" and open the client from the Actions menu.
- Open the "Accounting" Section and Click "Add Deposit/Payment" — Near the bottom of the client's page.
- Choose Transaction Type — Deposit, Payment, Refund, or Application Fee.
- Enter Payment Details — Amount, method (Credit Card, Check, Cash, Wire Transfer, or Other), reference number, and optional notes.
- Save — The invoice and the client's balance update automatically.
- Asking the Client to Pay Online? — Use "Request Deposit" in the same Accounting section to send them a deposit request with a pay link instead.
View and Download a Client's Invoice
Quickly access and download an up-to-date invoice showing the client's trips, taxes, and payments.
- Open the Client's Record — Go to "Clients" → "Client List" and open the client from the Actions menu.
- Open the "Accounting" Section — Near the bottom of the client's page.
- Click "View Invoice" — Opens the full invoice.
- Download or Print — Download the PDF from the invoice view or print it directly.
Send a Waiver or Contract for Signature
Send your clients a waiver or contract to sign electronically through HuntDocs.
- Open the Client's Record — Go to "Clients" → "Client List" and open the client from the Actions menu.
- Open the "Contracts, Waivers, and Documents" Section — On the client's page.
- Select a Document Template — Use the dropdown under "Send Document for Signature" to choose a document from your Contracts Library.
- Click "Send Document for Signature" — Sends it to the client's email for electronic signing.
- Track Signature Status — Monitor progress in the same section. Signed copies attach to the client's record automatically.
Upload and Manage Client Documents
Attach contracts, gear lists, or other important documents directly to a client's record.
- Open the Client's Record — Go to "Clients" → "Client List" and open the client from the Actions menu.
- Open the "Contracts, Waivers, and Documents" Section — On the client's page.
- Use "Upload New Document" — Select the PDF and categorize it (Waiver, Contract, Gear List, and so on).
- View, Download, or Delete — Manage uploaded documents from the same section.
Create and Duplicate a Hunt
Save time by duplicating existing hunts instead of starting from scratch. This is ideal for seasonal variations, multiple species, or repeating dates.
- Create a New Hunt — Open “Hunts” → “Create Hunt” from the left-hand menu (or click the orange “+” on your Available Hunts list). Fill in the details like species, dates, and pricing.
- Use the Duplicate Icon — On the Hunts list, click the folder icon next to any hunt to duplicate it.
- Edit the New Hunt — Adjust the year, dates, or species as needed. HuntDocs will auto-fill the rest.
- Save — Click “Save” to create the new hunt. It will now appear in your list, ready to book for clients.
Create and Manage Group Invoices
Every group booking gets a shared group invoice automatically. Set who leads the group and who pays, review the totals, and download a polished PDF for billing.
- Open the Group — Click "Groups" in the left-hand menu and open the group's Manage Group page.
- Set the Leader and Payer — The Group Summary shows who leads the group and who is financially responsible — they can be different people. To change either, open a participant's Actions menu and choose "Make Leader" or "Make Payer."
- Click "View Invoice" — Opens the group invoice, built from each participant's booked trips and services.
- Review the Totals — The invoice adds up each participant's trip price, discounts, services, taxes, and deposits into a full group summary.
- Download the PDF — Export a clean, formatted copy of the invoice with the payer's details, line items by participant, and a payment summary.
- Email It to the Payer — The "Send Invoice to [payer's first name]" button on the Manage Group page emails the payer the invoice totals with a Pay Online link. The payer also sees the group invoice, with its balance and a Pay Online button, when they log into their client portal.
- Track Payments — Payments and deposits recorded on the group's participants are automatically included in the group invoice balance.
Manage Group: Run a Group Trip from One Page
Every group booking has a Manage Group page — the command center for the trip. It shows who's coming, who leads, who pays, what's signed, and what's owed, and it's where you add people, change roles, and handle group paperwork. Open it from "Groups" in the left-hand menu.
Reading the Page
- Group Summary — The leader, the payer, the organizer, how many participants are confirmed, the group invoice number, total, and balance — with View Payer, View Invoice, and Send Invoice to [payer] buttons.
- The participants table — Each person's contract and waiver status, overall readiness, price, payments, and balance at a glance.
Adding Someone
- Click "Add Participant" — Search your existing clients or create a new one right in the window.
- Set their details — Their spot on the hunt, or check the Observer box for a non-hunting companion (fee, days, and who pays — see Adding Observers).
- Add them — They join the roster and the group invoice updates.
The Actions Menu (Per Person)
- Make Leader / Make Payer — Reassign who leads the group and who's financially responsible.
- Make Organizer — Give that person the Group Organizer role: their own link to the group dashboard, where they see the trip, the participants, and the invoice.
- Send Documents — Send signing paperwork to just that person.
- Edit Price — Change one participant's price; the group invoice follows.
- Make Observer / Make Participant — Flip someone between hunting and observing.
- Remove — Takes them off the trip the safe way: their booking is cancelled rather than erased, so any payments and signed documents survive, and you decide what happens to money they've paid.
Send Itinerary
The Send Itinerary button emails the trip details out. It previews first and flags anything missing before anything sends, so the group never gets a half-finished itinerary.
The Organizer's Link
When the group has an organizer, a Resend Organizer Link button sits under their name in the Group Summary. It emails them a fresh link to their group dashboard — use it any time an organizer can't find their original email, or right after you make someone the organizer of an existing group. Every send shows on their Messages tab with delivery status.
What Your Clients See
Only what you send — booking emails, documents, the itinerary, and (for the organizer) their group dashboard link. Roster changes themselves don't notify anyone.
Important Notes
- Removing one member never cancels the group — the rest of the trip is untouched. To call off the whole trip, use Cancel Group Trip (see Cancelling a Trip).
- Money and billing live on their own topics — Create and Manage Group Invoices and Assign Payers cover who gets billed and how.
- Empty slots — A reserved spot with no name yet shows on the roster; remove it if the group shrinks.
Payment Terms
Payment Terms let you define your standard billing expectations — like Net 15 or Net 30 — so they appear automatically on every invoice you create. Set them once in Settings and HuntDocs handles the rest.
Setting Your Default Payment Terms
- Go to Settings — Click your profile icon in the top right and select "Settings."
- Find the Invoicing Module — Scroll down to the Invoicing section.
- Select Your Default Payment Terms — Choose from the dropdown: Due on Receipt, Net 15, Net 30, Net 45, Net 60, or Custom.
- Custom Terms — If you select Custom, a text field will appear where you can type any payment terms you want — for example, "50% due at booking, balance due 60 days prior to hunt." This text will appear on your invoices exactly as written.
- Save Settings — Click "Save Settings" at the top of the page to apply your selection.
How Terms Appear on Invoices
- Automatically Stamped on New Invoices — When a new invoice is created — whether through Trip Builder or by opening an individual client's invoice for the first time — HuntDocs automatically stamps your default terms onto it. You do not need to do anything manually.
- Displayed in the Invoice Header — Terms appear in the invoice details block alongside Invoice #, Date, and Due Date — exactly where your clients expect to see them, matching professional invoicing standards.
- Shown on PDFs — The Terms field prints on all downloadable invoice PDFs, including group invoices and single-hunt invoices.
- Existing Invoices Are Not Affected — Changing your default terms in Settings will not modify any invoices that have already been created or sent. Only new invoices created after the change will carry the updated terms.
Due Date Calculation from Terms
- Terms Drive the Due Date — When HuntDocs creates a new invoice, the due date is automatically calculated from your default terms. Net 15 sets the due date 15 days from the invoice date, Net 30 sets it 30 days out, and so on. Due on Receipt sets the due date to the same day as the invoice date.
- Custom Terms — If your terms are set to Custom, HuntDocs uses a 30-day default for the due date calculation since there is no numeric value to calculate from. You can adjust the due date manually if needed.
Trip Builder: When You Set a Final Balance Due Date
- Explicit Due Date Takes Priority — In Trip Builder, you can set a specific Final Balance Due Date under the Deadlines section. When you do, that date is used directly as the invoice due date — the terms-based calculation is bypassed entirely.
- Terms Are Not Shown — When a Final Balance Due Date is explicitly set in Trip Builder, the Terms field is intentionally left blank on the invoice. Showing "Net 15" on an invoice whose due date was manually set to a specific date would be misleading to your client.
- No Final Balance Due Date Set — If you do not set a Final Balance Due Date in Trip Builder, HuntDocs calculates the due date from your default terms and displays the terms label on the invoice normally.
QuickBooks Integration
- If you have QuickBooks connected, your payment terms are automatically synced to QuickBooks when an invoice is pushed. HuntDocs looks up the matching term in your QB account and links it, so your QB invoices reflect the same terms as your HuntDocs invoices.
- Custom terms are not synced as a QB term — instead, the custom text is included in the invoice memo field in QuickBooks so it remains visible to your client.
The Contracts Library: Your Document Templates
The Contracts Library holds the reusable documents you send for signature — waivers, contracts, and agreements. Set a document up once, and it's ready to send to any client or attach to any booking package. You can build a document right in HuntDocs or upload one you already have.
Option 1: Build a Document in the Editor
- Open "Contracts Library" — From the left-hand menu.
- Write the Document — Use the editor's blocks: headers, sections, dividers, images, and a signature line where the client signs.
- Insert Autofill Fields — Fields like the client's name, hunt dates, prices, and your outfit's details fill in automatically for each client when the document is sent — one template serves everyone.
- Require Your Counter-Signature (Optional) — Check the counter-signature box if the document should come back to you to sign after the client does.
- Save Template — It joins your library, ready to send.
Option 2: Upload a Finished Document
- Use the Upload Form — Give it a title, choose the document type, and pick the file.
- Make It Available for Booking (Optional) — Check the box to let this document be attached to booking packages in Trip Builder.
Where Your Templates Get Used
- Send for signature — From a client's page: "Contracts, Waivers, and Documents" → Send Document for Signature.
- Booking packages — In Trip Builder's Documents section, so every new booking sends the right paperwork automatically.
Important Notes
- Templates vs. filled-out forms — The library holds the blank template; each client's signed copy lands on their own record.
- Need the client to fill in answers, not just sign? — That's a Smart Form (see the next topics) — questionnaires, medical forms, and applications with fields the client completes.
Build a Smart Form
A Smart Form is a custom form your clients fill out and sign online — registrations, medical forms, questionnaires, applications, or full contracts with fields to complete. You design it once in the builder; clients fill it out from any device, and every answer lands on their record.
Creating a Form
- Open "Communications" → "Smart Forms" — Your list of forms.
- Click "New SmartForm" — Name it and open the builder.
- Add Your Questions — Text, email, phone, number, date, dropdowns, multiple choice, and checkboxes. Use section breaks to organize longer forms.
- Add Signature Blocks Where Needed — A signature block turns the form into a signed document. Signature blocks can require a parent or guardian to sign for minors, and you can add initials blocks for key paragraphs.
- Add a Payment Step (Optional) — A payment block collects a deposit as part of submitting the form.
- Save — The form appears in your Smart Forms list, ready to send.
Managing Your Forms
- Duplicate — Copy a form as the starting point for a new one (Actions → Duplicate).
- Download fillable PDF — A paper version, from the same Actions menu.
- Archive — Retire a form you no longer use without deleting its history.
Important Notes
- Forms with a payment step can't be used offline — everything else can (see Offline / In-Person Signing).
- Editing a form later doesn't change copies clients already submitted — those are preserved as signed.
Send a Smart Form: Four Ways to Collect It
Once a Smart Form is built, there are four ways to get it in front of people — pick per form, and mix freely. However it goes out, every submission comes back to the same place.
1. Email It to a Specific Person
Use the Send menu on your Dashboard → Smart Form, pick the form and the recipient, and they get an email with a secure personal link. Best for known clients — their submission attaches straight to their record.
2. Share a Public Link
On the Smart Forms page, switch on the form's Public toggle and click Copy public URL. Post it anywhere — your website, social media, an email blast. People verify with a text-message code before filling it out, so you know who's submitting.
3. Embed It on Your Website
Switch on Embed and click Copy embed code — the form appears right inside your own site, no link-clicking required.
4. Collect It in Person
Use Actions → Start Signing to hand your device to a walk-up client, or Print QR for a scan-to-sign sheet — including with no cell service at all. Full details in Offline / In-Person Signing below.
Attach It to Bookings
Add the form in Trip Builder's Documents section and it rides the booking package — every client booked on that trip is asked to complete it automatically.
Important Notes
- Every send is tracked — who it went to, whether they've opened it, and whether they've finished.
- Resend anytime — a fresh secure link goes out; nothing the client already entered is lost.
After They Sign: Responses, PDFs, and Counter-Signing
When someone submits a Smart Form, HuntDocs files everything for you: a signed PDF is generated automatically, the submission attaches to the right person's record, and anything that needs your attention — like a counter-signature — comes to you.
What Happens on Every Submission
- A signed PDF is generated and stored on the client's record under "Contracts, Waivers, and Documents."
- The signer gets a copy — they can download it from the confirmation screen, and it's emailed to them.
- New people become contacts automatically — if the signer isn't in your system yet, HuntDocs creates a contact record from their answers; if they match an existing client, the form attaches to that record.
Viewing Responses
- Open "Communications" → "Smart Forms" and click the form.
- Open its submissions list — every response, with status: in progress, completed, signed, or counter-signed.
- Click a submission — every answer, plus the signed PDF.
Counter-Signing
If the form requires your counter-signature, you're notified when a client signs. Open it, review their answers, and sign — the finished PDF then carries both signatures.
Fixing a Mistake After Submission
A completed submission can be amended — correct the answers, and HuntDocs keeps a tracked revision history (what changed, when) and produces an amended PDF, with the option to send the corrected copy to the client. The original is never silently overwritten.
Important Notes
- Trip Builder sees form status — booking packages that include the form show whether each client has completed it.
- A submission you can't find usually belongs to a contact record rather than a client — check both, or email [email protected] and we'll trace it.
Offline / In-Person Signing
Offline signing lets walk-up clients sign waivers and SmartForms on your device without an internet connection — perfect for remote camps, trailheads, or anywhere connectivity is unreliable. Signatures are stored securely on the device and sync to HuntDocs automatically when you reconnect.
Setting Up a Form for Offline Use
- Go to Smart Forms — Navigate to the Smart Forms page from the left sidebar.
- Enable the Offline / In-Person Toggle — Find the form you want to use offline and flip the toggle in the Offline / In-Person column. Note: forms that contain a payment step cannot be used offline.
- Prime the Form Before You Leave WiFi — This Step Is Critical — As soon as you enable the toggle, HuntDocs will open the signing form in a new tab. This loads and caches the form on your device. You must do this while connected to WiFi or cellular. If you skip this step, the form will not be available offline.
- Use the Actions Menu → Start Signing — To open the form on your device for a client to sign, click the Actions button next to the form and select "Start Signing." Hand the device to your client.
- Print the QR Code (Optional) — From the Actions menu, select "Print QR" to generate a printable QR code. Clients can scan this with their own device to sign the form directly. Their device must also have visited the form while online to use it offline.
How the Signing Process Works
- Online Mode — If your device has connectivity when the client hits Sign, the form submits immediately and a contact record or client record is created in HuntDocs right away.
- Offline Mode — If there is no connectivity, the signed form is saved securely to the device. A banner at the bottom of the screen shows how many signatures are pending sync. The form is ready for the next signer immediately.
- Automatic Sync — When your device reconnects, HuntDocs detects the connection and syncs all pending signatures automatically — usually within a few seconds. A "Sync Complete" screen confirms what was processed.
- Multiple Signers — After each signature, tap "Next Signer" to reset the form for the next client. You can collect as many signatures as needed before reconnecting.
Minor Signers and Guardian Signatures
- Date of Birth Field — If the form includes a guardian-enabled signature block, a Date of Birth field will appear. Enter the signer's date of birth.
- Guardian Section — If the signer is under 18, a Guardian Signature section automatically appears. The guardian must enter the minor's full legal name, their relationship to the minor, and sign with their own name.
- Name Verification — The minor's name entered in the Guardian section must match the first and last name filled out in the form fields. The form will not submit if these do not match.
After Sync — What Happens in HuntDocs
- New Contact Created — If the signer is not already in your system, HuntDocs creates a new Contact record automatically using the name and email they provided.
- Existing Client Matched — If the signer's email and name match an existing client or contact in your account, the signed document is attached to their existing record.
- Needs Attention Flags — If no email was provided, or if the name could not be matched confidently, the sync results screen will flag the record for your review. You can manually link it to an existing client from within HuntDocs.
- Signed PDF Generated — A completed PDF of the signed form is automatically generated and attached to the client's record, just like an online submission.
- Confirmation Email — If the signer provided an email address, they will receive a confirmation email with a copy of their signed document once the sync completes.
Using the QR Code for Walk-Up Signing
- Print the QR Code — From the Actions menu next to your form, select "Print QR." This opens a printable sheet with a QR code linked directly to the offline signing form.
- Post It at Check-In — Tape the QR code to your check-in table, clipboard, or camp entrance. Clients scan it with their own phone or tablet to open the signing form directly.
- Client Devices Must Be Primed — For signing to work offline on a client's own device, that device must have visited the form while connected to WiFi at least once. If clients are scanning the QR code cold in the field with no connection, the form will not load. This method works best when clients scan and complete the form before leaving cell service — for example, at the trailhead or upon arrival at camp while still connected.
- Best Use Case — The QR code works best as a convenience tool when connectivity is available, allowing multiple clients to sign simultaneously on their own devices without waiting to use yours. For true remote offline use with no connectivity at all, the outfitter's primed device using the Start Signing button is the more reliable method.
Important Reminders
- Do not clear your browser data before syncing — this will permanently delete any unsynced signatures stored on the device.
- Safari on iPhone/iPad — If the form is not loading offline, go to Settings → Safari → Advanced → Website Data, delete the HuntDocs entry, and revisit the form while on WiFi to re-prime it.
- Forms with payments cannot be used offline — HuntDocs will prevent you from enabling offline mode on any form that includes a payment step.
- Each device must be primed separately — Enabling offline on one device does not make it available on another. Visit the form on each device while connected to WiFi before heading into the field.
QuickBooks Integration
HuntDocs syncs your customers, invoices, and payments to QuickBooks Online as you work, so your books stay current without manual exports or copy-paste. The sync runs in the background.
What Syncs
- Customers — Every client you add or edit in HuntDocs syncs to QuickBooks as a customer. Name, email, phone, and billing address are all pushed automatically.
- Invoices — When hunt pricing changes or a new invoice is created, the invoice syncs to QuickBooks with hunt details, additional services, discounts, tax, and CC processing fees as separate line items.
- Group Invoices — Group invoices sync as a single QuickBooks invoice on the group payer's customer record, with each participant's hunt listed as its own line item.
- Payments — Deposits and payments sync to QuickBooks and apply automatically to the correct invoice. Stripe payments include card type, processing fee, and net amount in the QuickBooks memo.
Connecting QuickBooks
- Go to Settings → Integrations — Scroll to the QuickBooks (Accounting) section.
- Click Connect QuickBooks — You'll be redirected to Intuit to authorize HuntDocs.
- Approve the Connection — Sign in to QuickBooks and approve the permissions HuntDocs requests. You'll be redirected back to HuntDocs with a confirmation message.
- Review Your Account Mappings — After connecting, click Account Mappings to confirm where sales tax lands in your QuickBooks (see Account Mappings below).
Account Mappings
- Sales Tax Goes to a Liability Account — Sales tax you collect is not revenue — it's money you owe your state. The Account Mappings page lets you control where tax posts in QuickBooks so it lands on your balance sheet as a liability, not in income.
- Automatic Suggestion — HuntDocs reads your QuickBooks Chart of Accounts and suggests the best-matching liability account (for example, "Sales Tax Payable"). You can confirm the suggestion or pick a different liability account from your chart.
- Action Recommended Banner — If a mapping needs your attention, a warning banner appears on the Settings page. Sync continues normally, but your books won't be fully correct until you confirm the mapping.
- Applies to New Invoices Only — Once confirmed, the mapping applies to new invoices going forward. Existing QuickBooks invoices are not reclassified automatically — your accountant can reclassify historical tax via a journal entry if needed.
- If QuickBooks Manages Sales Tax Itself (Automated Sales Tax) — Common for GST, HST, and PST. HuntDocs can't post into the tax accounts QuickBooks manages on its own, so the tax collected on your HuntDocs invoices still needs a regular liability account of yours — the Account Mappings page asks you to pick one for each tax rate. If the list is empty, create one in QuickBooks first (Chart of Accounts → New → Other Current Liability, named something like "Tax Collected – HuntDocs"), then come back and choose it. Your accountant can move it from there when filing.
Sync Behavior
- Automatic and One-Way — Sync runs automatically when you save records in HuntDocs. Data flows from HuntDocs to QuickBooks only — changes made directly in QuickBooks will not sync back.
- Existing Records — Clients, invoices, and payments that existed before you connected QuickBooks do not sync automatically. To sync an existing client and all their invoices and payments at once, go to the client's page and click Sync to QB in the Accounting section.
- Sync Logs — Go to Settings → QuickBooks → Sync Logs to see every sync operation, including any errors. This is the first place to look if something doesn't appear in QuickBooks as expected.
Learn More
For the complete field-by-field reference, accountant guidance, and troubleshooting steps, open the full QuickBooks Integration Guide from Settings → Integrations → QuickBooks (click the "View Integration Guide" button).
Welcome Messages
Send a warm text message and/or email to your client before the booking package arrives. This sets a personal tone before they see documents and payment details.
How It Works
- Client gets a welcome text — A short SMS arrives first, so they know you're excited to have them.
- Client gets a welcome email — A branded email follows moments later with a personal greeting.
- Booking package arrives last — Documents, invoices, and payment links come after the welcome messages have set the tone.
Create SMS Templates
- Go to Communications → SMS Templates — Open your text message template list.
- Click "New SMS Template" — Give it a name and write your message. Use merge tags like [[First Name]], [[Hunt Species]], [[Arrival Date]], and [[Guide First Name]] to personalize automatically.
- Set as default — Check "Default" to have it pre-selected in Trip Builder. You can have one default welcome SMS template.
- Character count matters — The editor shows your character count and how many SMS segments your message will use. Keep it short — one segment (160 characters) is ideal.
Create Email Templates
- Go to Communications → Email Templates — Open your email template list.
- Click "New Template" — Select "Welcome Email" as the template type. This separates it from your broadcast email templates.
- Use merge tags — Insert tags like [[First Name]], [[Hunt Dates]], [[Guide First Name]], and [[Outfitter Name]] using the Hunter Info button in the editor.
- Set as default — Check "Default" to pre-select it in Trip Builder.
Sending from Trip Builder
- Add a client and hunt — Build your booking as usual in Trip Builder.
- Welcome Messages section — Below the totals, you'll see checkboxes for "Send welcome text" and "Send welcome email" with template dropdowns. If you have default templates, they're pre-selected.
- Click Book & Send — The welcome text and email fire first, followed by the booking package after a short delay.
- Single booking — Welcome messages go to the client.
- Group booking — Welcome messages go to the organizer only.
SMS Consent & Phone Requirements
- Phone number required — If the client has no phone number on file, the SMS checkbox is disabled and shows "No phone number on file."
- SMS consent required — If the client hasn't given SMS consent, the checkbox is disabled and shows "SMS consent not given." You can enable consent on their client profile.
Tracking
View sent welcome emails and texts in Communications → Communications Tracking. Welcome emails appear in the Recent Email Messages table with the label "Welcome Email." Text messages appear in the Recent Text Messages table at the bottom of the page.
Merge Tag Reference
SMS tags: [[First Name]], [[Hunt Species]], [[Arrival Date]], [[Guide First Name]]. Your outfitter name is automatically added to the beginning of every text.
Email tags: [[First Name]], [[Last Name]], [[Full Name]], [[Species]], [[Hunt Dates]], [[Arrival Date]], [[Hunt Duration]], [[Hunt Unit]], [[Guide First Name]], [[Guide Full Name]], [[Outfitter Name]], [[Outfitter Phone]]
Send a Bulk Email
Send one branded email to exactly the right group — draw results to this year's applicants, a cancellation opening to your waitlist, a season announcement to everyone. You pick the audience, write the email once, and HuntDocs personalizes and delivers it to each person.
Step 1: Pick Who Gets It
- Open "Communications" → "Send Bulk Email"
- Choose your sources — Clients, Contacts, or both.
- Narrow with filters — Camp, species, year, week, weapon, and unit for clients; status for contacts. Or select one of My Lists (see the Lists topic) for a hand-picked audience.
- Review the recipient list — Duplicates are removed automatically, anyone who hasn't opted in is excluded (shown so you know), and bad addresses are flagged.
Step 2: Write and Send
- Compose in the branded editor — Headers, sections, your logo, and buttons; or Load Template to start from one you've saved.
- Personalize with "Add Hunter Information" — Insert fields like first name so every recipient gets their own version.
- Preview It — Desktop and mobile views, and Send Test to email it to yourself first.
- Send — The button shows exactly how many people it's going to.
- Save as Template (Optional) — Keep the design for next time.
What Your Recipients See
Your branded email, personalized to them. Replies come to your reply-to address like any other email.
Important Notes
- Opt-in is enforced for you — people who haven't agreed to marketing email are excluded automatically, which protects your sending reputation.
- Track results on Communications → Communications Tracking.
- Always send yourself the test first — thirty seconds that catches typos before three hundred people see them.
Email & SMS Templates: Write It Once, Use It Everywhere
Templates save the messages you send over and over — welcome notes, season updates, standard texts — so sending is one click instead of a rewrite. Both live under Communications, and both fill in each client's details automatically with merge tags.
Email Templates
- Open "Communications" → "Email Templates" and click "New Template."
- Pick the type — Welcome Emails (sent with bookings from Trip Builder) are kept separate from your broadcast templates (used in bulk email).
- Write it with merge tags — Use the Hunter Info button to insert tags like [[First Name]], [[Hunt Dates]], and [[Guide First Name]] — they fill in per client at send time.
- Set a default (optional) — The default welcome template comes pre-selected in Trip Builder.
SMS Templates
- Open "Communications" → "SMS Templates" and click "New SMS Template."
- Write the message — Tags like [[First Name]], [[Hunt Species]], [[Arrival Date]], and [[Guide First Name]] personalize each text. Your outfitter name is added to the front of every text automatically.
- Watch the segment counter — It shows how many text-message segments you're using. One segment (160 characters) is the sweet spot.
- Set a default (optional) — Pre-selected for welcome texts in Trip Builder.
Where Templates Get Used
- Trip Builder — Welcome text and email when you Book & Send (see Welcome Messages).
- Bulk email — Load Template in the compose step.
- Texts to clients — Reusable texts start from your SMS templates.
Important Notes
- A tag with no data shows blank — if a client has no guide assigned yet, [[Guide First Name]] fills with nothing, so write sentences that survive a missing value.
Communications Tracking: Did It Send, and Did They Open It?
When you're wondering "did that email actually go out?" — this page is the answer. It logs your outgoing messages with delivery status, so you can check instead of guess.
What's On It
- Every message — A searchable table of sends: when, what kind, to whom, and its status.
- Bulk email performance — Per campaign: recipients, delivered, opened, clicked, unsubscribed, bounced.
- Recent Smart Forms — Form sends with a one-click Resend for anyone who lost the link.
- Recent Text Messages — Your outgoing SMS log.
Reading the Numbers
- Delivered means their mail server accepted it — the email arrived.
- Bounced means the address is bad — fix it on the client's record. The record warns you too: a red Email not delivering badge appears next to their address after a bounced send, and clears once a later email goes through.
- Opened and clicked are useful signals, not gospel — some email apps block open tracking, so a "not opened" email may still have been read.
Important Notes
- Find it at Communications → Communications Tracking.
- A message you can't find here may have sent from a surface this page doesn't log yet — email [email protected] with the client's name and we'll trace it.
Marketing Assets: QR Codes, Lead Forms, and the Table Tent
The Marketing page holds your lead-capture toolkit — a public contact form, trackable QR codes for shows and events, and a print-ready table tent — all feeding new names straight into your Contacts list.
What's In the Toolkit
- Your Prospect Contact Form — A public "Get in Touch" page for your outfit. Copy the link for your website, social bio, or email signature; every submission becomes a contact automatically.
- Custom Event QR Codes — Create a QR per event ("SCI Show 2027"), and the page tracks how many contacts each one captured — so you know which shows actually produce.
- Pre-made QR Codes — Ready-to-print codes (PNG or SVG) for your form and registration links.
- Table Tent — A print-ready PDF for your booth or check-in counter: scan the code, land on your form.
- Leads Captured (Last 30 Days) — The scoreboard.
Using It at a Show
- Create an event QR — Name it for the show, download, print, display.
- Prospects scan and fill out the form — 30 seconds on their own phone.
- Work the list when you're home — every scan is a contact with follow-up tracking waiting (see Contacts).
Important Notes
- Find it at Communications → Marketing.
- The contact form is intentionally short — the fewer the fields, the more prospects finish it.
Credit Card Processing Fee
Pass your credit card processing costs on to your clients. When enabled, clients who choose to pay by credit card will see the fee added to their payment amount. Clients who pay by check or cash pay the base invoice amount with no fee.
Enable in Settings
- Go to Settings — Click your profile icon in the top navigation bar and select "Settings."
- Find the Credit Card Processing Fee Section — Located under the Payment & Fees area of the Settings page.
- Toggle the Fee On — Check the box to enable the credit card processing fee.
- Set Your Fee Label — This is the name your clients will see (e.g., "Credit Card Processing Fee" or "Card Convenience Fee"). Choose something clear and professional.
- Set Your Fee Percentage — Enter the percentage you want to charge (e.g., 3%). This percentage is applied to the total transaction amount, which includes the subtotal plus tax. For example, a $4,500 hunt with $365.85 in tax has a total of $4,865.85 — a 3% fee on that total is $145.98. Keep your percentage within card-network and state limits (see Important Notes below).
- Tax on Processing Fees (Optional) — If your jurisdiction requires it, check "Apply tax to processing fees" to include the fee in the taxable amount.
- Save Settings — Click Save. The fee will apply to all new bookings going forward. Existing invoices are not affected.
How It Works in Trip Builder
- Processing Fee Checkbox — When building a booking, you'll see a "Processing Fee" checkbox in the totals section. Check it to include the fee in the total — useful when quoting a client over the phone who plans to pay by card.
- Uncheck for Check/Cash Clients — If the client will pay by check or cash, leave it unchecked. The fee is not baked into the invoice — it's only added when the client chooses to pay by card.
What Your Client Sees
- Invoice Page — The invoice shows a clean total with no processing fee. Below the balance due, a "Pay Electronically" section lists payment options with the exact amount the client will pay for each method, plus a check/cash option with no fee.
- Deposit Requests — Deposit statements work the same way. The deposit amount is shown without the fee, and the payment options below show the deposit plus the fee for each method.
- Stripe Checkout — When the client clicks "Pay" next to the credit card option, Stripe opens with only the card payment method available. The amount includes the fee. The client cannot switch to another method at checkout.
- PDF Invoices — Downloaded PDFs show the same payment options section with clickable Pay links for each method.
- Booking Confirmation Email — The email shows the clean invoice total with no fee. A "View Invoice & Pay" button links to the invoice page where the client can choose their payment method.
Important Notes
- Fee Is on the Total Transaction Amount — The fee percentage is calculated on the subtotal plus tax — not the subtotal alone. This matches how Stripe charges you and ensures you recover your actual processing costs.
- Visa Caps Surcharges at 3% — If you accept Visa, your fee cannot exceed 3% or your actual merchant discount rate, whichever is lower. Check your Stripe dashboard for your effective rate.
- State Laws Vary — Some states restrict or cap credit card surcharges. Verify that surcharging is legal in your state and that your fee percentage complies with state limits.
- Existing Invoices Are Not Affected — The fee settings are snapshotted onto each invoice at booking time. Changing your settings does not change invoices that have already been created.
ACH / Bank Transfer Processing Fee
Offer your clients the option to pay by bank transfer (ACH) with a separate processing fee. ACH transfers typically cost less to process than credit cards, so you can pass on a lower fee — or a flat fee — to clients who choose this method.
Enable in Settings
- Go to Settings — Click your profile icon in the top navigation bar and select "Settings."
- Find the ACH Processing Fee Section — Located directly below the Credit Card Processing Fee section on the Settings page.
- Toggle the Fee On — Check the box to enable the ACH processing fee.
- Set Your Fee Label — The name your clients will see (e.g., "ACH Processing Fee" or "Bank Transfer Fee").
- Choose Fee Type — Select either "Percentage" or "Fixed Amount." Percentage works well for variable invoice amounts. Fixed amount works well if your ACH processing cost is a flat per-transaction fee (e.g., $5.00 per transfer).
- Set the Fee Amount — If percentage, enter the rate (e.g., 1%). If fixed, enter the dollar amount (e.g., $5.00). Percentage fees are calculated on the total transaction amount (subtotal plus tax).
- Tax on Processing Fees — The "Apply tax to processing fees" checkbox controls whether tax is applied to the processing fee amount. If checked, tax is applied to fees for all payment methods.
- Save Settings — Click Save. The ACH option will appear on all new invoices going forward.
What Your Client Sees
- Invoice Page — Below the balance due, the "Pay Electronically" section shows a "Bank transfer (ACH)" option with the fee and total amount. If multiple fee types are enabled, clients see all options side by side and can choose the one they prefer.
- Deposit Requests — Deposit statements show the same ACH option with the fee calculated on the deposit amount.
- Stripe Checkout — When the client clicks "Pay" next to the ACH option, Stripe opens with only the bank account payment method available. The amount includes the fee.
- ACH Processing Time — Bank transfers take 1–2 business days to process. Stripe will show the client this timeline during checkout. The payment may show as "Processing" in your deposit records until the transfer completes.
ACH Must Be Enabled on Your Stripe Account
- Stripe Must Support ACH — ACH direct debit must be enabled on your Stripe connected account before clients can pay by bank transfer. If it's not enabled, the ACH payment option will not appear at Stripe checkout even if you've configured the fee in HuntDocs.
- Contact HuntDocs Support — If you're unsure whether ACH is enabled on your account, email [email protected] and we'll help you verify and enable it.
Important Notes
- You Can Enable One or Both — You can offer just a credit card fee, just an ACH fee, or both. If only one is enabled, clients see only that payment option plus the check/cash option. If both are enabled, clients see all three options.
- ACH Fees Are Typically Lower — Most outfitters set their ACH fee lower than their credit card fee because bank transfers cost less to process. This gives clients an incentive to choose the cheaper method, which saves you money too.
- Existing Invoices Are Not Affected — Fee settings are snapshotted onto each invoice at booking time. Changing your settings does not change invoices that have already been created.
Refund a Client's Payment
When you need to send money back — a cancelled trip, an overpayment, or a reworked deal — issue the refund right from the client's page. Card and bank payments go back the way they came in, the client is notified automatically, and your balances and QuickBooks stay straight.
Issuing a Refund
- Open the Client's Record — Go to "Clients" → "Client List" and open the client from the Actions menu.
- Open the "Accounting" Section — Their payment history lists every deposit and payment.
- Click "Refund" on the Payment — Each payment that can still be refunded shows a Refund button on its row.
- Enter the Amount — The full refundable amount is pre-filled. Enter less for a partial refund — you can refund a payment in pieces until it's fully returned.
- Enter the Reason — Required, and shared with the client in their refund email, so write it for their eyes.
- Click "Issue Refund" — Done. The refund appears in the payment history and the balance updates.
What Happens Next
- Card and bank payments — Refunded through Stripe to the exact card or bank account the client paid with. Arrival timing depends on their bank.
- Cash and check payments — Recorded in HuntDocs only; return the money to the client directly.
- The client is emailed — Automatically, with the amount and your reason.
- QuickBooks — If connected, the refund syncs as a Refund Receipt, so your books match.
Important Notes
- 180-day window — Payments can be refunded in HuntDocs up to 180 days from the payment date. Older card payments must be refunded from your Stripe account directly.
- Cancelling a trip? — Use Cancel Trip instead (see Cancelling a Trip above) — it asks what to do with each payment as part of the cancellation, using this same refund machinery.
- Account-specific refund questions — A refund that isn't behaving as expected needs your account in front of us: email [email protected].
Request a Deposit or Payment
When you need money in — a booking deposit, a mid-season payment, or a final balance — send the client a deposit request. They get an email with the amount and a pay button, and when they pay, the money records itself against the right trip automatically.
Sending a Deposit Request
- Open the Client's Record — Go to "Clients" → "Client List" and open the client from the Actions menu.
- Open the "Accounting" Section and Click "Request Deposit"
- Set the Amount — A Flat Amount, or a Percentage of Balance — pick the trip and the screen shows its balance while you choose.
- Describe It — Required — e.g., "2026 Elk Hunt Deposit." This wording appears on the deposit statement and invoice.
- Attach It to a Trip (Optional) — Linked requests apply the payment to that trip's balance and show the trip details on the statement. Leave it general to collect money not tied to one trip.
- Add a Personal Message (Optional) — Included in the email.
- Click "Send Deposit Request"
What Your Client Sees
- An email with the amount, your description, your personal note, and a pay button.
- A deposit statement page — If you've enabled payment-method fees, it shows each payment option (card, bank transfer, check/cash) with the exact amount for each, just like invoices do.
What Happens When They Pay
- Card and bank payments record themselves automatically and update the trip's balance — nothing to enter by hand.
- The request appears in the Accounting section with a Resend option if the email needs another nudge.
Important Notes
- Cancelling a trip cancels its open deposit requests automatically — a client can't pay for a trip that's off.
- Recording money you received outside HuntDocs (a check in the mail) is different — see Record a Deposit or Payment above.
Auto-Reminders: Chase Deposits, Balances, and Documents Automatically
Auto-Reminders send the follow-ups you'd otherwise write by hand — deposits that haven't arrived, scheduled payments and balances coming due or past due, documents still unsigned. Each reminder can go by email, text, or both, on the days you choose — before the due date, on it, or after it — and every message can be edited to sound like you. Reminders stop on their own the moment a payment or signature comes in.
Setting Up Your Schedule
- Go to Settings — Click your profile icon, select "Settings," and find the Auto-Reminders card. Click "Manage Auto-Reminders."
- Turn reminders on — The switch at the top runs everything. Each reminder type — Deposit, Scheduled Payment, Final Balance, and Documents — has its own checkbox too.
- Shape each schedule — Open a type and set its reminders: up to 3 before the due date, one on the due date, and up to 3 after. Each reminder picks its channel — Email, Text, or Email + text — and its number of days.
- Make the messages yours — Click "Edit message" on any reminder. Every one ships with a ready-to-send message; change the wording, or click "Reset to the standard message" to go back. On texts, merge tags fill in the client's name, hunt, amount, and due date automatically, with a live counter showing how it sends. Use "Email myself a test" or "Text myself a test" to see exactly what your client would get.
- Save Reminder Settings — Changes take effect with the next morning's reminders.
How Text Reminders Behave
- Clients without a cell number on file get the email only — a text step never blocks the reminder from going out by email.
- Texts send between 9am and 8pm in the client's time zone (Sundays from noon), and a client never gets more than one reminder text per day.
- A client who replies STOP gets no more texts — their reminders keep arriving by email.
- Your pay link and the opt-out line are added to every text automatically — they're never something you can lose while editing.
When Reminders Hold Themselves Back
- Money in stops the chase — the moment a payment covers what a reminder is about, that reminder stops. Signed documents stop document reminders the same way.
- A client who just paid something isn't nagged — any payment recorded in the last few days quiets that trip's money reminders.
- If you've just reached out yourself — sent them an invoice or payment message personally — the automatic reminders stand down for a few days.
- A client mid-conversation isn't texted — if they've texted you back recently, reminder texts hold while the conversation is live.
The Auto-Reminders Page
Open Communications → Auto-Reminders to see the whole picture:
- Overdue — Deposits, scheduled payments, balances, and documents past their date, with the next reminder date for each.
- Due This Week and Upcoming — What's scheduled, and exactly when each reminder sends ("Sends today," "Sends Aug 12").
- Recently Sent — The last 7 days of sends, including a "no response" flag when a reminder went out and the item is still unresolved.
Who Gets Reminded
- Payment reminders go to whoever pays — the client on a solo trip, the payer on a group. On groups using Assign Payers, each payer is reminded about their own invoice.
- Document reminders chase unsigned documents — on group trips they go to the organizer.
- Cancelled trips are never dunned — cancelling a trip stops its reminders automatically.
Important Notes
- Reminders run off each trip's deadline dates — Deposit Due, Scheduled Payment, Documents Due, and Final Payment Due, set in Trip Builder's Deadlines section. A trip with no dates has nothing to remind about.
- Your current schedule keeps working as-is — until you change it, reminders send exactly as they always have: email, 7 days and 1 day before each due date.
- You stay in control — turn any reminder type off on the Reminder Settings screen and those reminders stop.
Set Up Tax Rates
Create the tax rates you collect — state sales tax, GST and PST, local taxes — and pick your default. Every new booking's invoice then calculates tax automatically, and each offering can override the default with custom rates or no tax at all.
Creating a Tax Rate
- Go to Settings — Find the tax section and click "Add Tax Rate."
- Name It and Set the Percentage — e.g., "Kansas State Tax" at 6.5, or "Saskatchewan GST" at 5. The name appears on invoices, so use words your clients will recognize.
- Add the Jurisdiction (Optional) — Country, level (Federal, State, Province, Local), and jurisdiction name keep a long list organized. Internal notes are never shown to clients.
- Save — The rate joins your list, showing its name, rate, and jurisdiction.
- Pick Your Default — Use the "Default Tax Rate" dropdown in Settings. This is the rate offerings use unless you say otherwise.
How Tax Applies to an Offering
Every offering has a Tax choice on its form (Hunts → Create Hunt, or when editing):
- Default rate — Uses your outfitter default. Most offerings should use this.
- Custom rates — Apply one or more specific rates together — e.g., GST + PST for a Saskatchewan hunt.
- Not taxable — No tax on this offering.
Where Tax Shows Up
- Invoices — Tax calculates on taxable items and shows on the invoice and PDFs.
- Additional services — Each service you add in Trip Builder has its own tax setting.
- Processing fees — Whether card/bank fees are taxed is controlled in the fee settings (see the Credit Card Processing Fee topic).
- QuickBooks — Confirm where collected tax posts on the Account Mappings page, so it lands as a liability, not income (see the QuickBooks Integration topic).
Important Notes
- No default set means no tax — an offering set to "Default rate" with no default chosen in Settings bills without tax. The offering form warns you.
- Existing invoices keep their tax — invoices remember the tax they were created with; changing rates affects new bookings going forward.
The Financials Dashboard: Your Season's Money at a Glance
One page that answers the four money questions: what will this season bring in, what has actually arrived, what's still owed, and what each hunt is really making after staff pay and expenses. Open Financials from the left-hand menu and pick the year at the top — everything on the page is scoped to that season.
What's On It
- Season scorecard — Total revenue, total costs (staff pay plus expenses, including general overhead), profit, and margin for the year.
- Cash position — What's been collected, what's outstanding, which invoices are overdue, what's expected in the next 30 days, and the staff pay coming due in the next 30 days.
- Hunt-by-hunt profit & loss — Each hunt's revenue, tax, staff pay, expenses, profit, and margin — plus how many spots are real bookings (money down) versus reservations (no money yet).
- By species — The same rollup grouped by species, so you can see which trips actually earn.
- Expenses — Record costs against a specific hunt or as general overhead; both feed the profit numbers.
- Customer deposits on file — Money collected that isn't applied to a trip yet is shown separately, so it never inflates a season's revenue.
What Your Client Sees
Nothing — the Financials dashboard is entirely internal.
Important Notes
- A brand-new hunt won't show yet — a hunt joins the profit table once it has a booking with money down or costs recorded against it. If a new hunt seems missing, that's why.
- Staff pay uses your Staff Invoices — paid and approved invoices when they exist, estimates from the assignment's pay rate otherwise. Turn on pay tracking (see Staff Pay Tracking) for the most accurate picture.
- Numbers look off? — Money questions about your specific account are exactly what we're for: email [email protected].
Client Clicks "Pay" and Nothing Happens (Finish Your Stripe Setup)
If your client clicks "Pay" on an invoice and it doesn't go anywhere — the page just reloads and nothing charges — the most common cause is that your Stripe payment setup was started but never finished. Stripe will not accept card or bank payments until you complete every step it asks for. This is quick to fix.
How to Tell This Is the Problem
- The "Pay" button does nothing — Your client (or you, testing it) clicks Pay and the invoice page simply reloads. No Stripe checkout screen appears.
- "Connected" doesn't always mean "ready" — HuntDocs shows Stripe as "Connected" as soon as an account exists, even if setup isn't finished. So a green "Connected" badge in Settings does not guarantee you can actually accept payments.
- Started but never completed — This usually happens when you began connecting Stripe, then closed the Stripe setup form before finishing all of it (business details, bank account, and accepting Stripe's terms).
How to Fix It — Finish Your Stripe Setup
- Log into HuntDocs — Sign in as you normally do.
- Open the Stripe setup form — In the same browser, go to myhuntdocs.com/connect/stripe/start/. This takes you straight into Stripe's secure setup for your account. (You can also reach it from Settings → Integrations → Stripe.)
- Complete every step — Work through each item Stripe shows. Stripe requires all of them before it will turn payments on — see the checklist below.
- You're done — When Stripe says your account is complete, your invoices are immediately payable. Nothing to change inside HuntDocs.
What Stripe Needs From You
Have these ready before you start — this is the standard information Stripe collects before enabling payments:
- Business details — Your business type, your industry, and your business website or a short description of what you do.
- Your identity — The name, date of birth, and Social Security number (last 4 digits) of the person responsible for the account. Stripe uses this to verify you — it is required for every account that accepts payments.
- A bank account — The routing and account number where your payouts should be deposited.
- Accept Stripe's terms of service — The final step. Payments stay off until the terms are accepted.
- A statement descriptor — The short business name that appears on your client's card or bank statement.
How to Confirm It's Working
- Stripe stops showing "Restricted" — Once setup is complete, your account is no longer restricted and Payments are no longer paused.
- The "Pay" button opens Stripe — Open one of your invoices and click Pay. You should now be taken to Stripe's checkout screen instead of reloading the page.
- Still stuck? — Email [email protected] and we'll check your account status and walk you through any remaining steps.
How to Use Lists to Organize Your Clients and Contacts
Lists let you group your clients and contacts into categories you define — like "Cancellations," "2026 Elk Draw Applicants," "Landowner Tag Interest," or "Warm Leads." Name them anything you want. Once you've created a list, you can see everyone on it, use it as an audience for a bulk email, or just keep your people organized for quick reference.
Creating a List and Adding People
- Go to your Client List or Contact List — Lists work with both. You'll find your Client List under Clients and your Contact List under CRM.
- Check the box next to the names you want to group — When you check at least one box, the bulk action controls appear at the top of the list. This is how you access all list actions.
- Add to an existing list or create a new one — Use Add to List and select a list from the dropdown to add selected people to an existing list. Or type a name in the Create New List + Add field and click the button — HuntDocs creates the list and adds the selected people in one step.
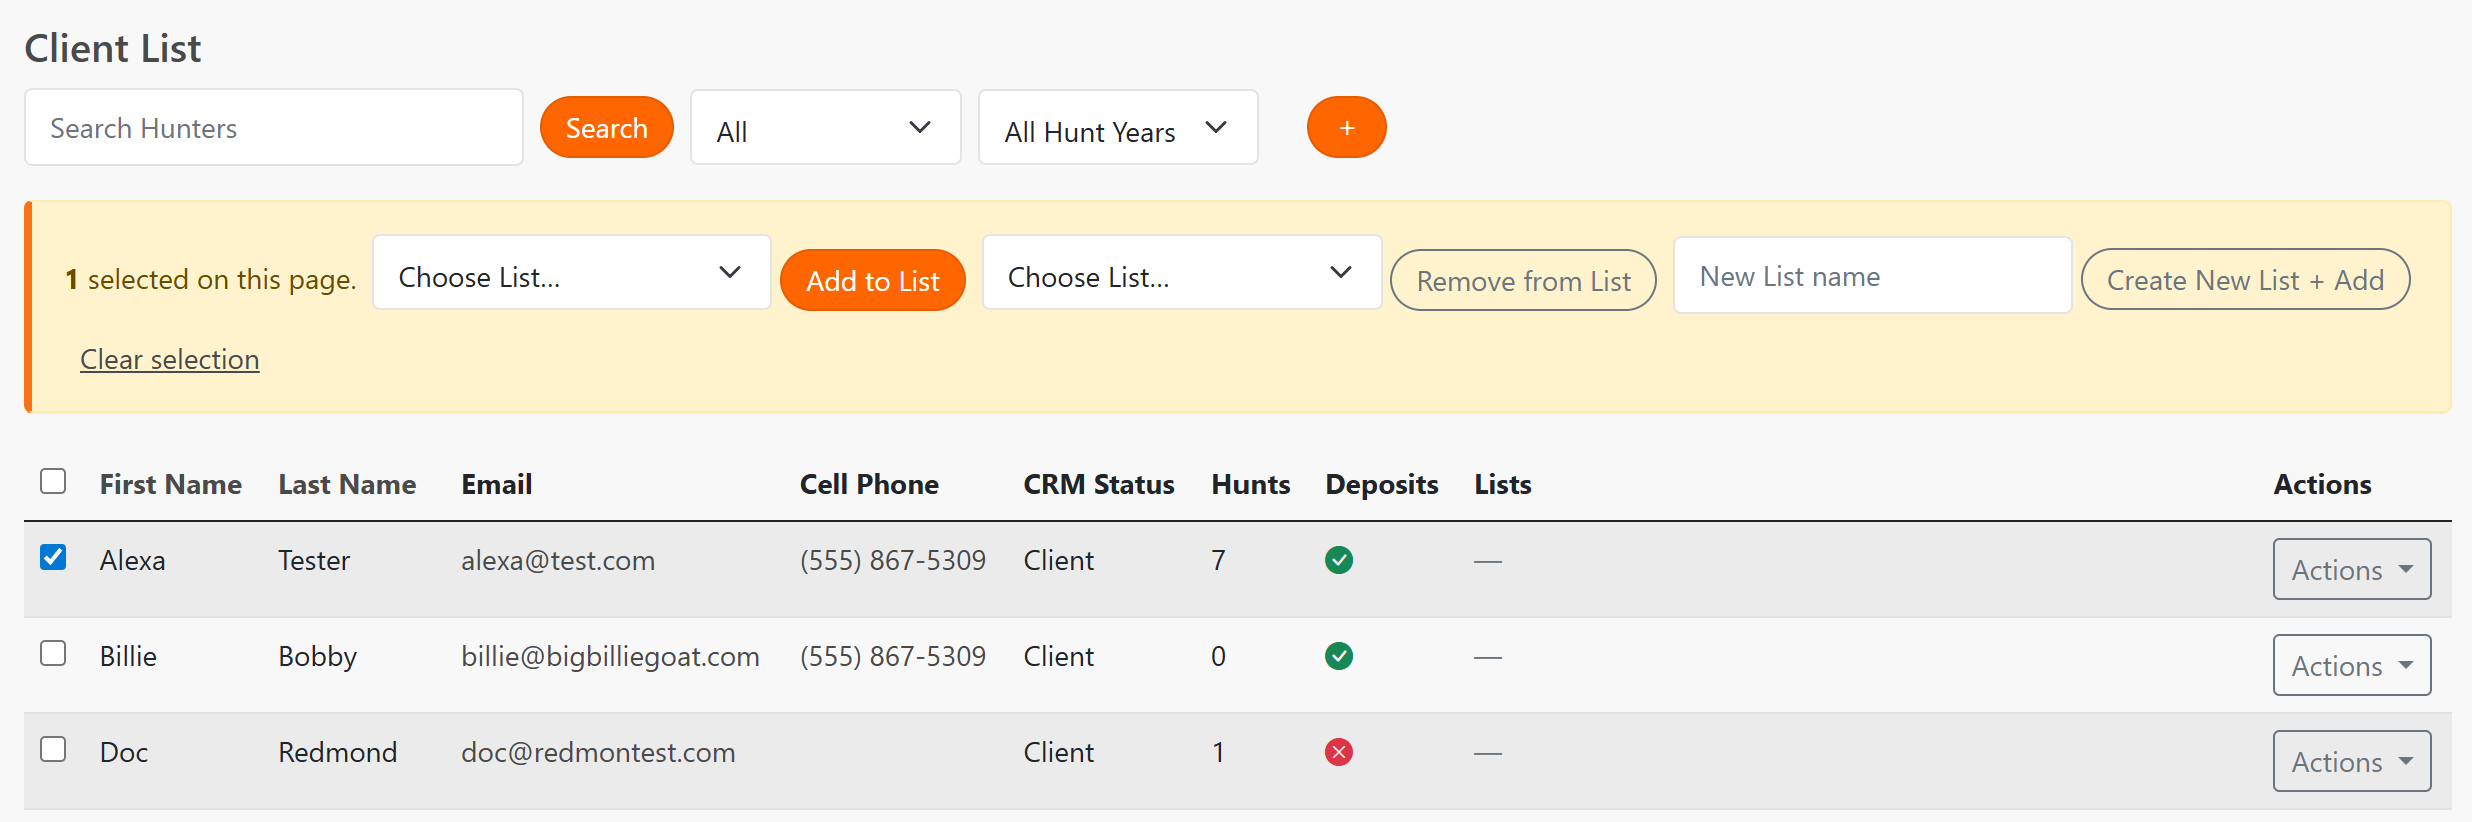
Removing People from a List
- Go to your Client List or Contact List — Same starting point as adding.
- Check the box next to the names you want to remove — The bulk action controls will appear.
- Choose "Remove from List" — Select the list from the dropdown and click the button.
Viewing and Managing Your Lists
Go to Communications → Manage Lists to see all your active lists. From here you can:
- View list members — Click a list to see everyone on it, whether they're a client or a contact.
- Rename a list — Update the name anytime.
- Archive a list — Remove a list you no longer need. Archiving does not delete any clients or contacts — it only removes the list grouping.
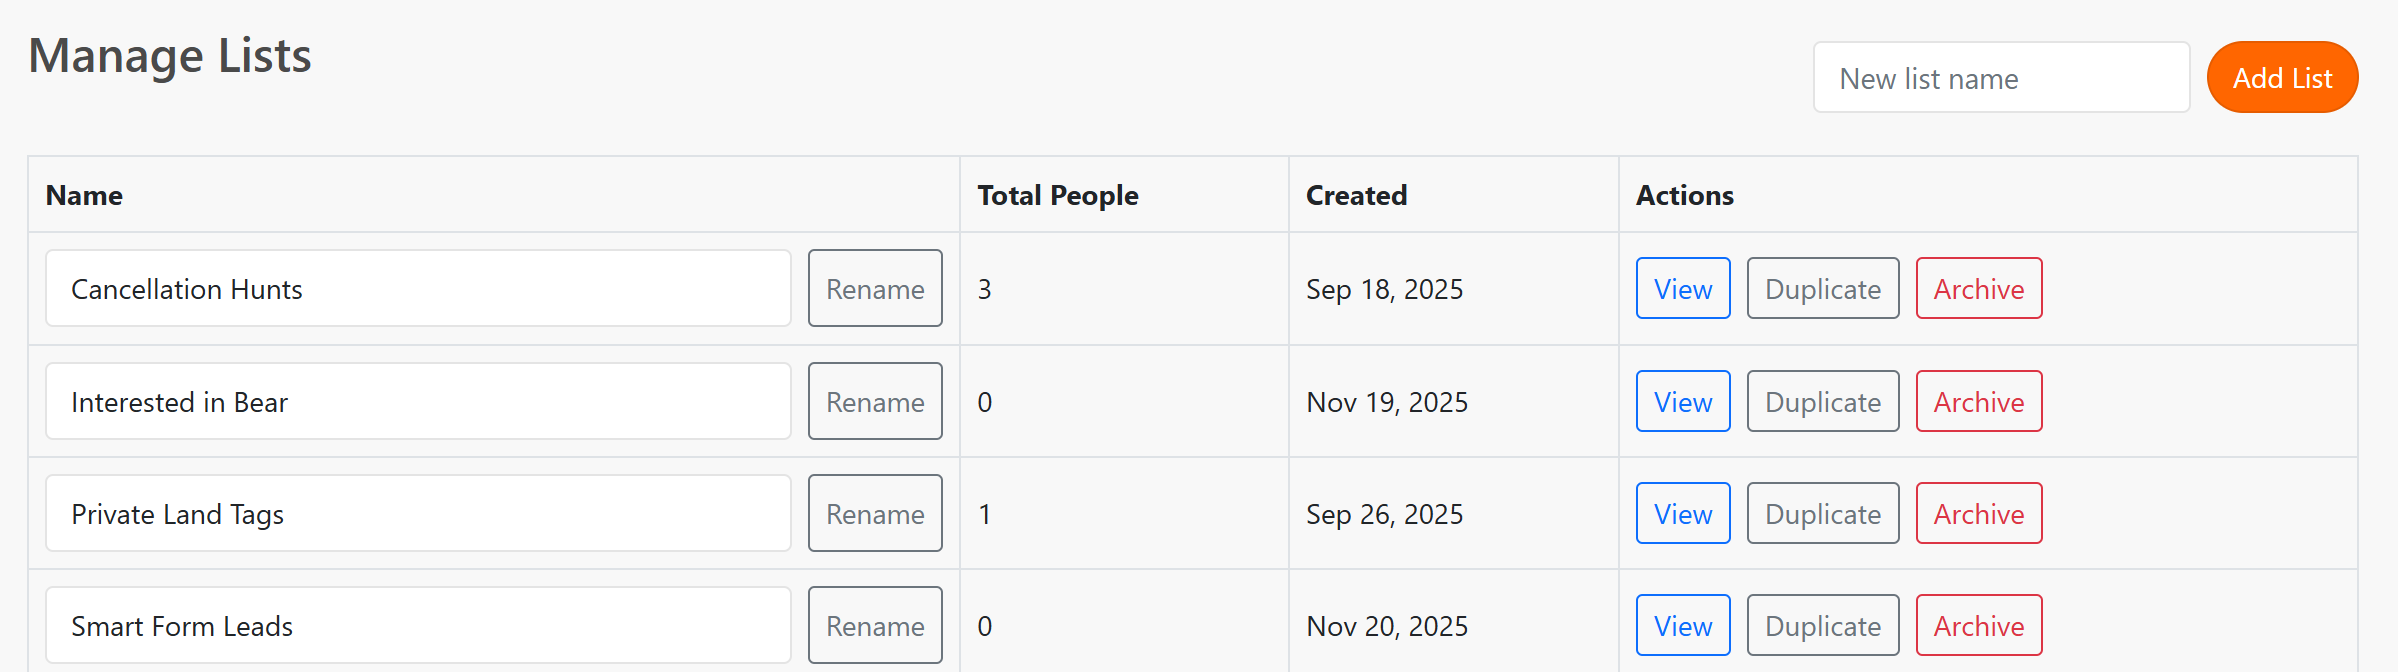
Using a List for Bulk Email
When you create a bulk email in Communications, you can select a list as your audience. This sends your email only to the people on that list instead of your entire database.
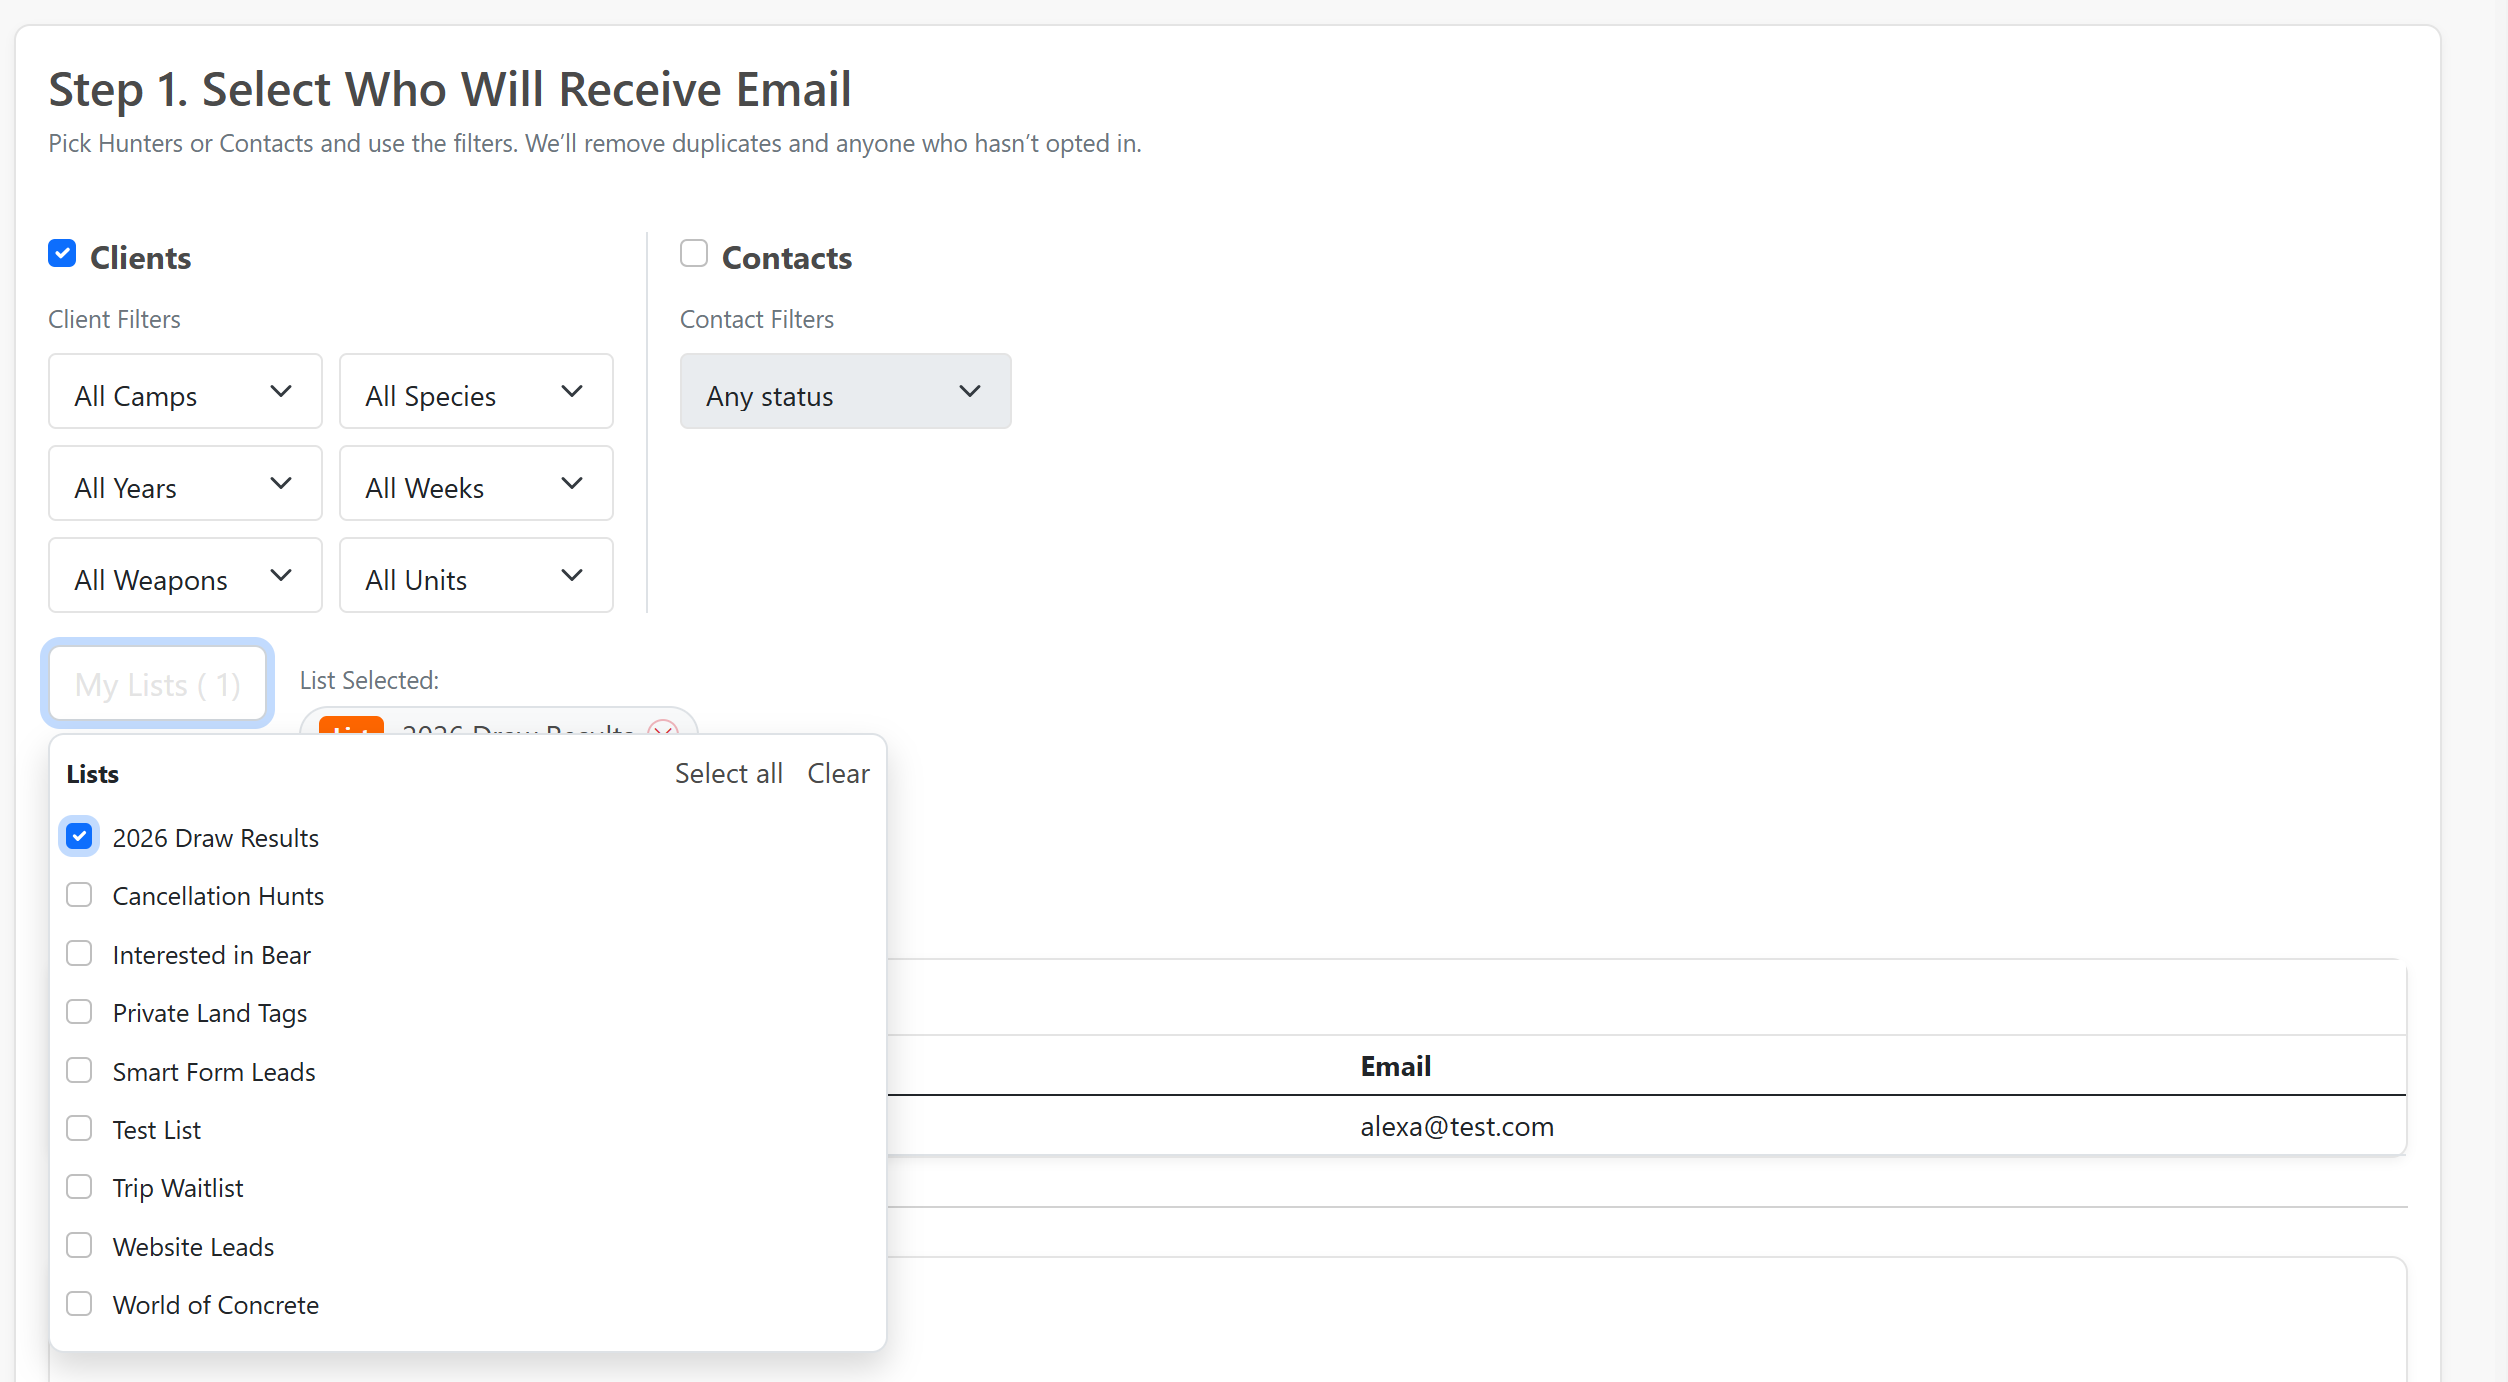
What Your Client Sees
Nothing. Lists are internal to your HuntDocs account. Your clients and contacts don't see what lists they're on.
Ideas for Lists
- Cancellations — People who want to be notified when you have a cancellation. When a spot opens, you know exactly who to contact.
- Draw Applicants — Everyone who applied for a specific unit or draw this year. Message the whole group with next steps after results come in.
- Landowner Tag Interest — Clients interested in a landowner tag. When tags become available, your list is ready.
- Warm Leads — Contacts who inquired but haven't booked yet. Follow up with that group instead of losing track of them.
Important Notes
- Lists work for both clients and contacts — you can have both on the same list.
- You can add the same person to multiple lists.
- List names are flexible — name them whatever makes sense for your operation.
- Communications → Manage Lists is where you go to see who's on each list, rename lists, and archive lists you no longer need.
- Archiving a list does not delete clients or contacts — it only removes the list grouping.
Adding Observers (Non-Hunting Companions) to a Booking
Observers are non-hunting companions who join a trip without taking a hunt slot — spouses, photographers, friends, or anyone traveling with a booked client. You can add observers to any booking, set a daily or flat fee, and control who pays.
Adding an Observer from the Client Record
- Open the client's detail page — Navigate to the client who has the booked trip.
- Find the trip card — Open the Booked Hunts accordion and locate the trip.
- Click Add Observer — In the STATUS section at the bottom of the trip card, click the "Add" link next to Observer.
- Search for a client — Type the observer's name to search existing clients. If they're not in the system, you can create a new client from the modal.
- Set the fee — Enter an observer fee amount (per day), or leave at $0 for no charge.
- Set the number of days — Enter how many days the observer will be on the trip. The total fee is calculated as fee × days.
- Choose who pays — Select "Hunter pays" (fee appears on the client's invoice) or "Observer pays" (observer gets their own invoice and booking email with a deposit link).
- Save — The observer appears in the STATUS section with their fee, billing, and Edit/Remove links.
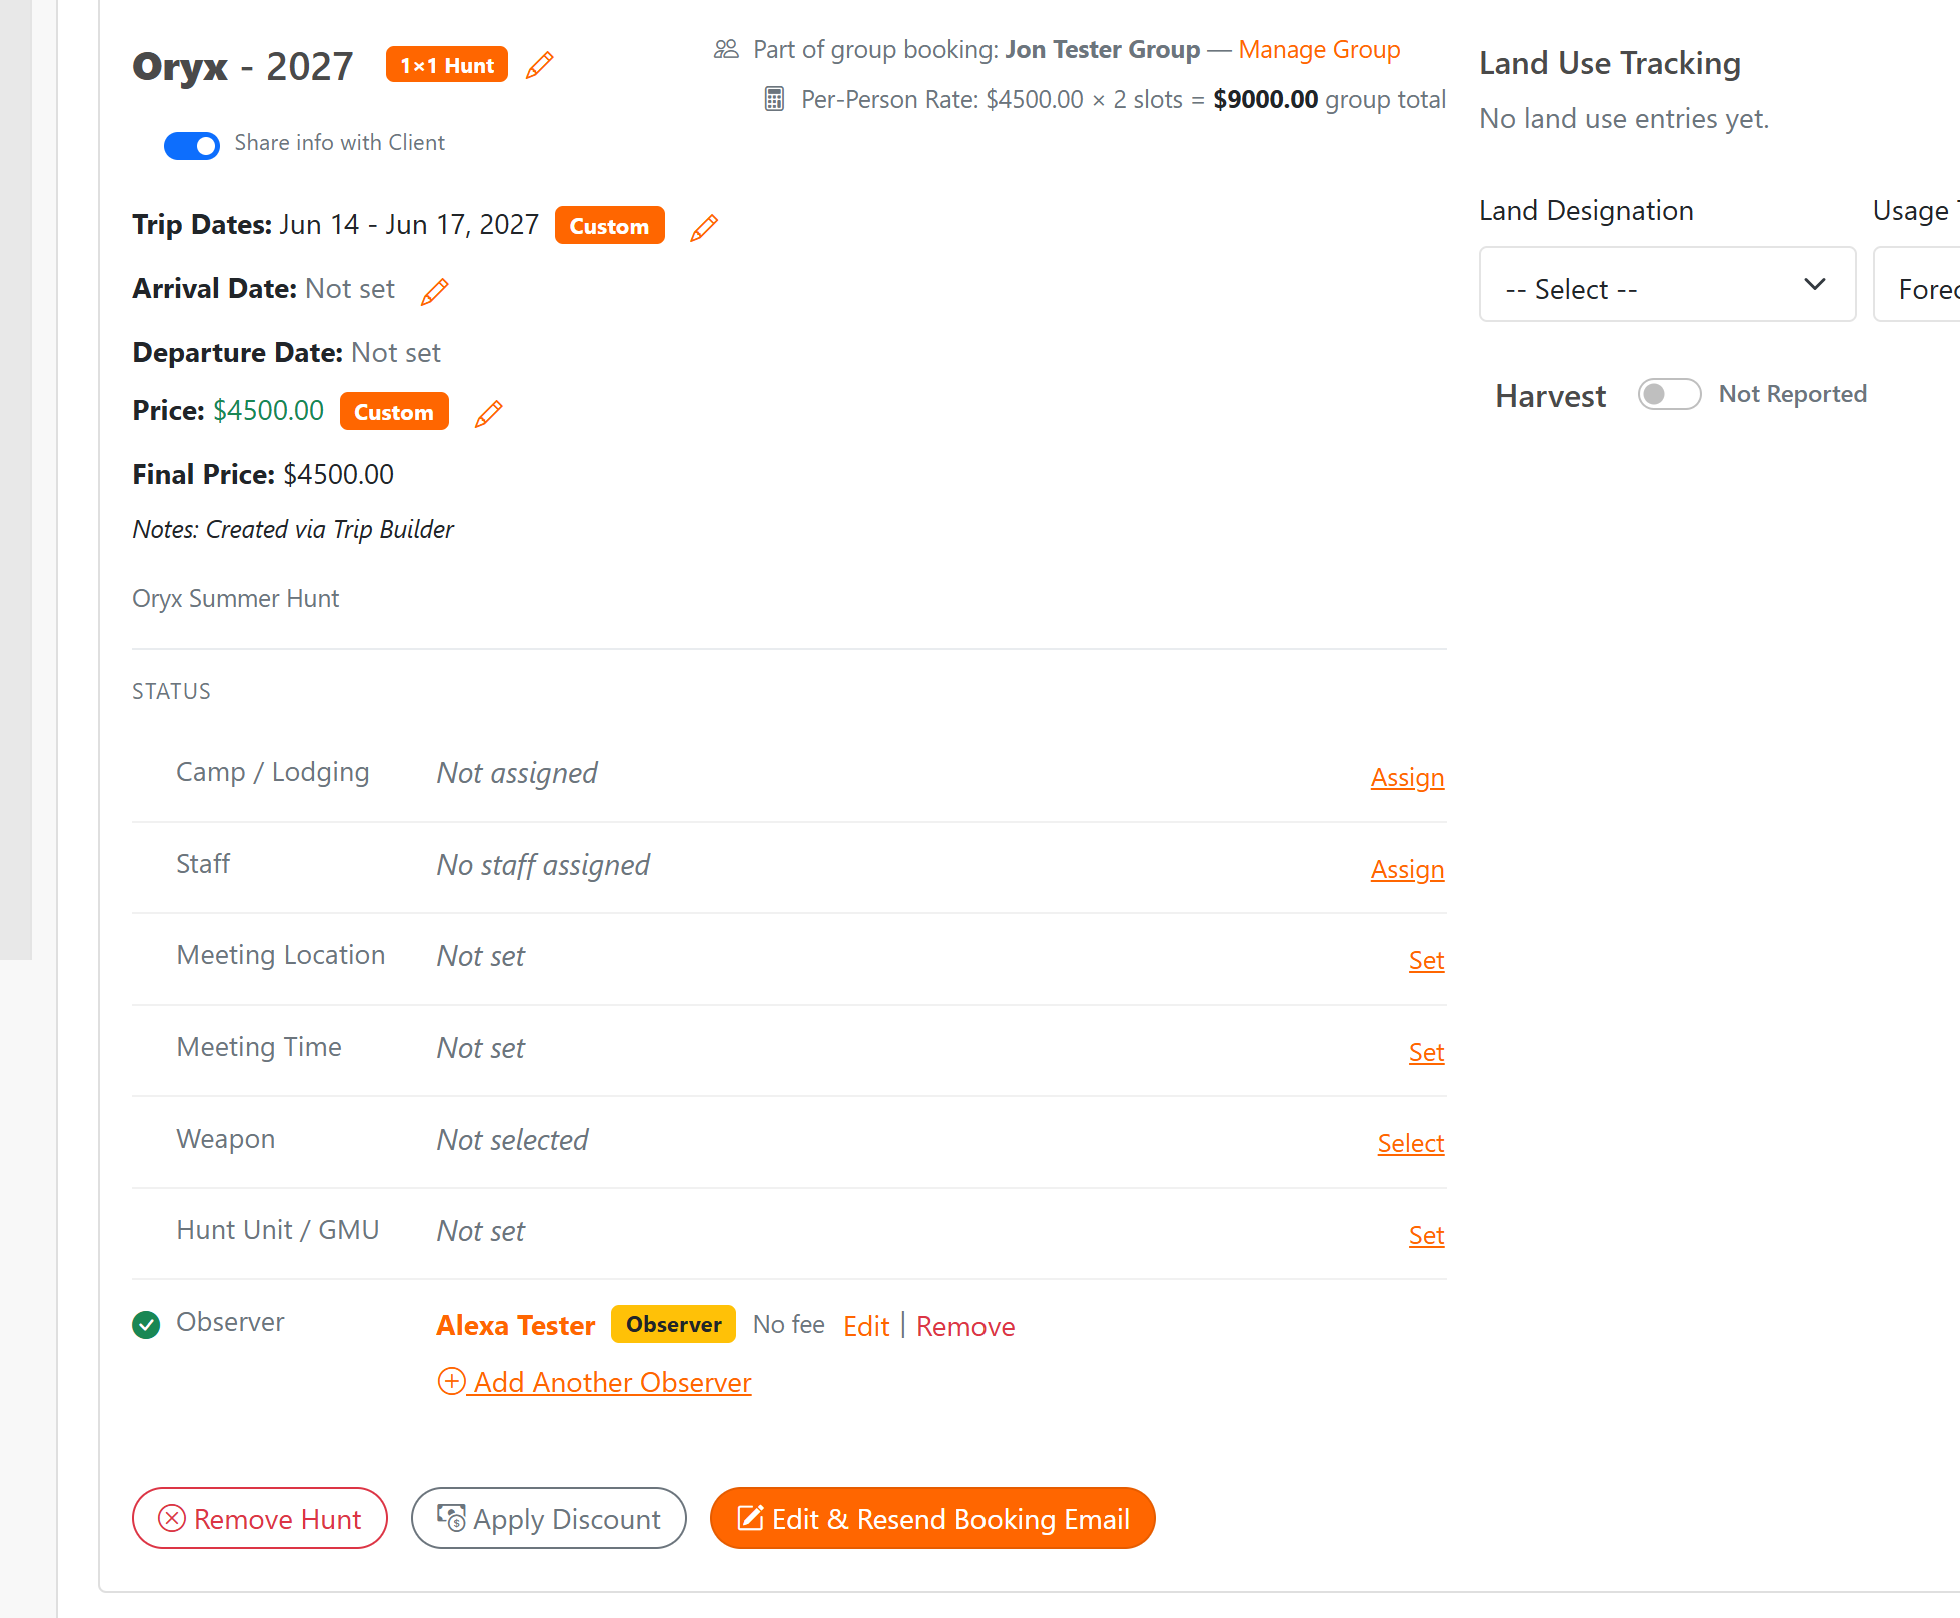
Adding an Observer in Trip Builder
- Open Trip Builder — Start a new booking or edit an existing draft.
- Add participants — Add the client and the observer as separate participants.
- Check the Observer box — On the observer's participant card, check the Observer checkbox. The hunt price for that participant drops to $0.
- Set the fee and days — Enter the per-day observer fee and the number of days.
- Choose who pays — Select Hunter pays or Observer pays.
- Book the trip — The observer fee appears as a separate line item on the invoice. The observer does not count toward the hunt slot quantity.
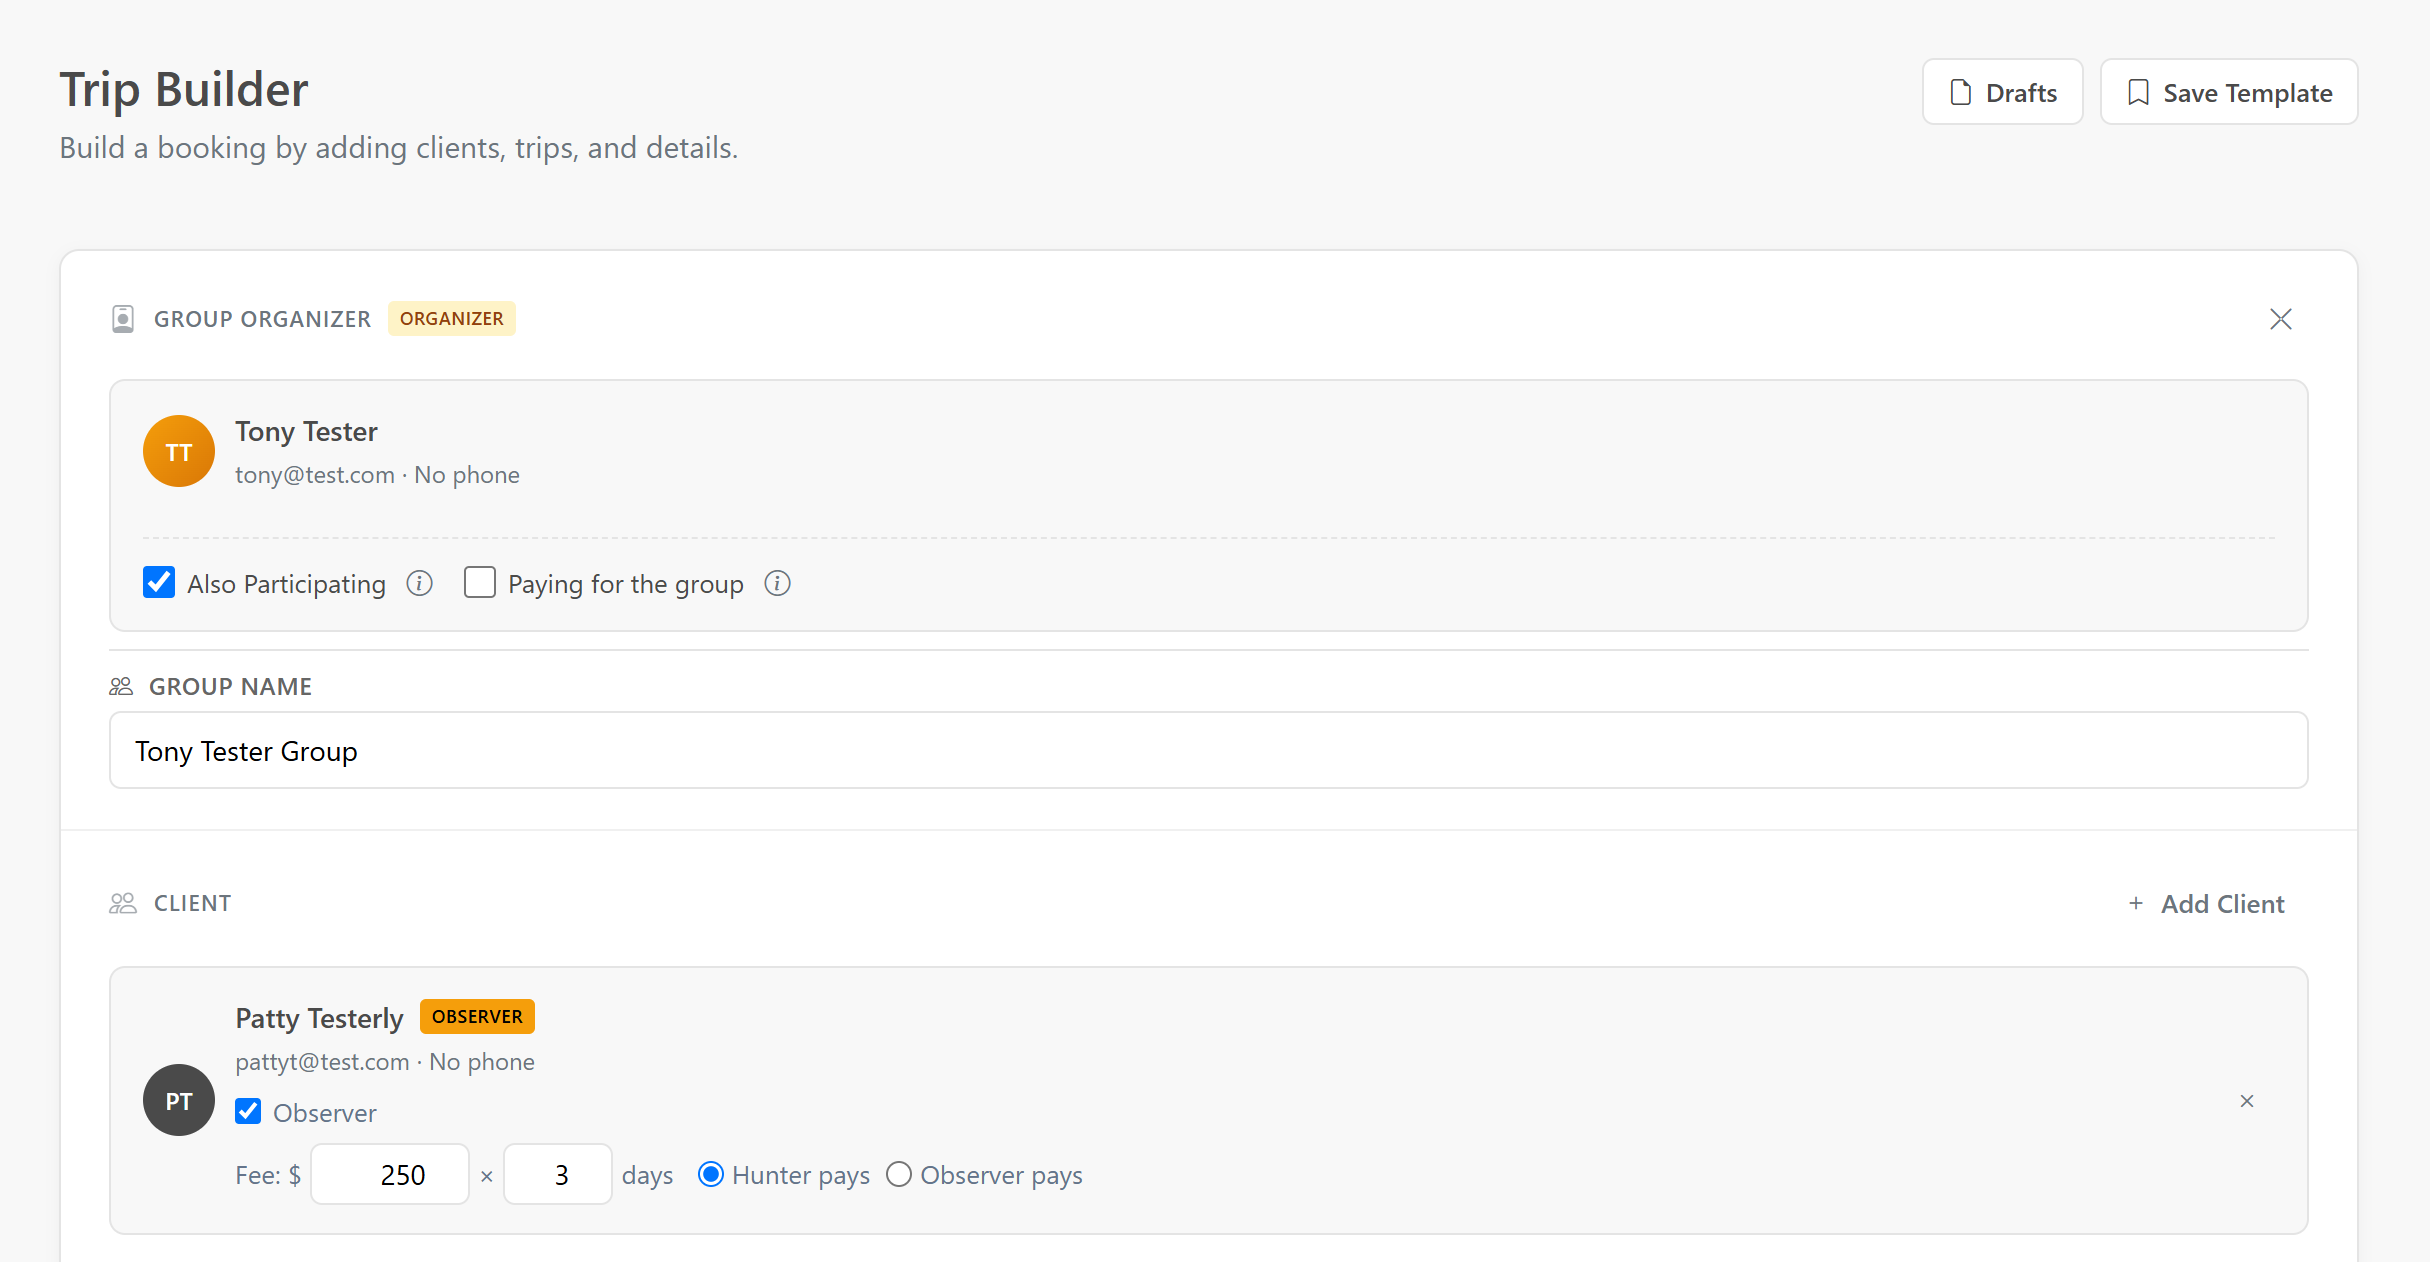
Adding an Observer from Manage Group
There are two ways to add an observer to a group booking from the Manage Group page:
Option 1: Add a New Participant as an Observer
- Click Add Participant — On the Manage Group page, click the Add Participant button.
- Search or create a client — Find an existing client or create a new one from the modal.
- Check the Observer box — Fee, days, and billing controls appear below the checkbox.
- Set the fee, days, and billing — Enter the per-day fee, the number of days, and choose who pays. Everything is set in one step.
- Add the participant — The observer appears in the participant table with the Observer badge. If they are a self-pay observer with a fee, they receive a booking email with a deposit link automatically.
Option 2: Toggle an Existing Participant to Observer
- Open the Actions dropdown — On the participant's row in the Manage Group table, click Actions.
- Click Make Observer — A modal appears with fee, days, and billing controls.
- Set the fee, days, and billing — Same controls as the Add Participant modal. Set everything in one step and submit.
- Toggle back — To convert an observer back to a regular participant, open Actions and click Make Participant. This removes the observer fee and switches them back immediately — no modal needed.
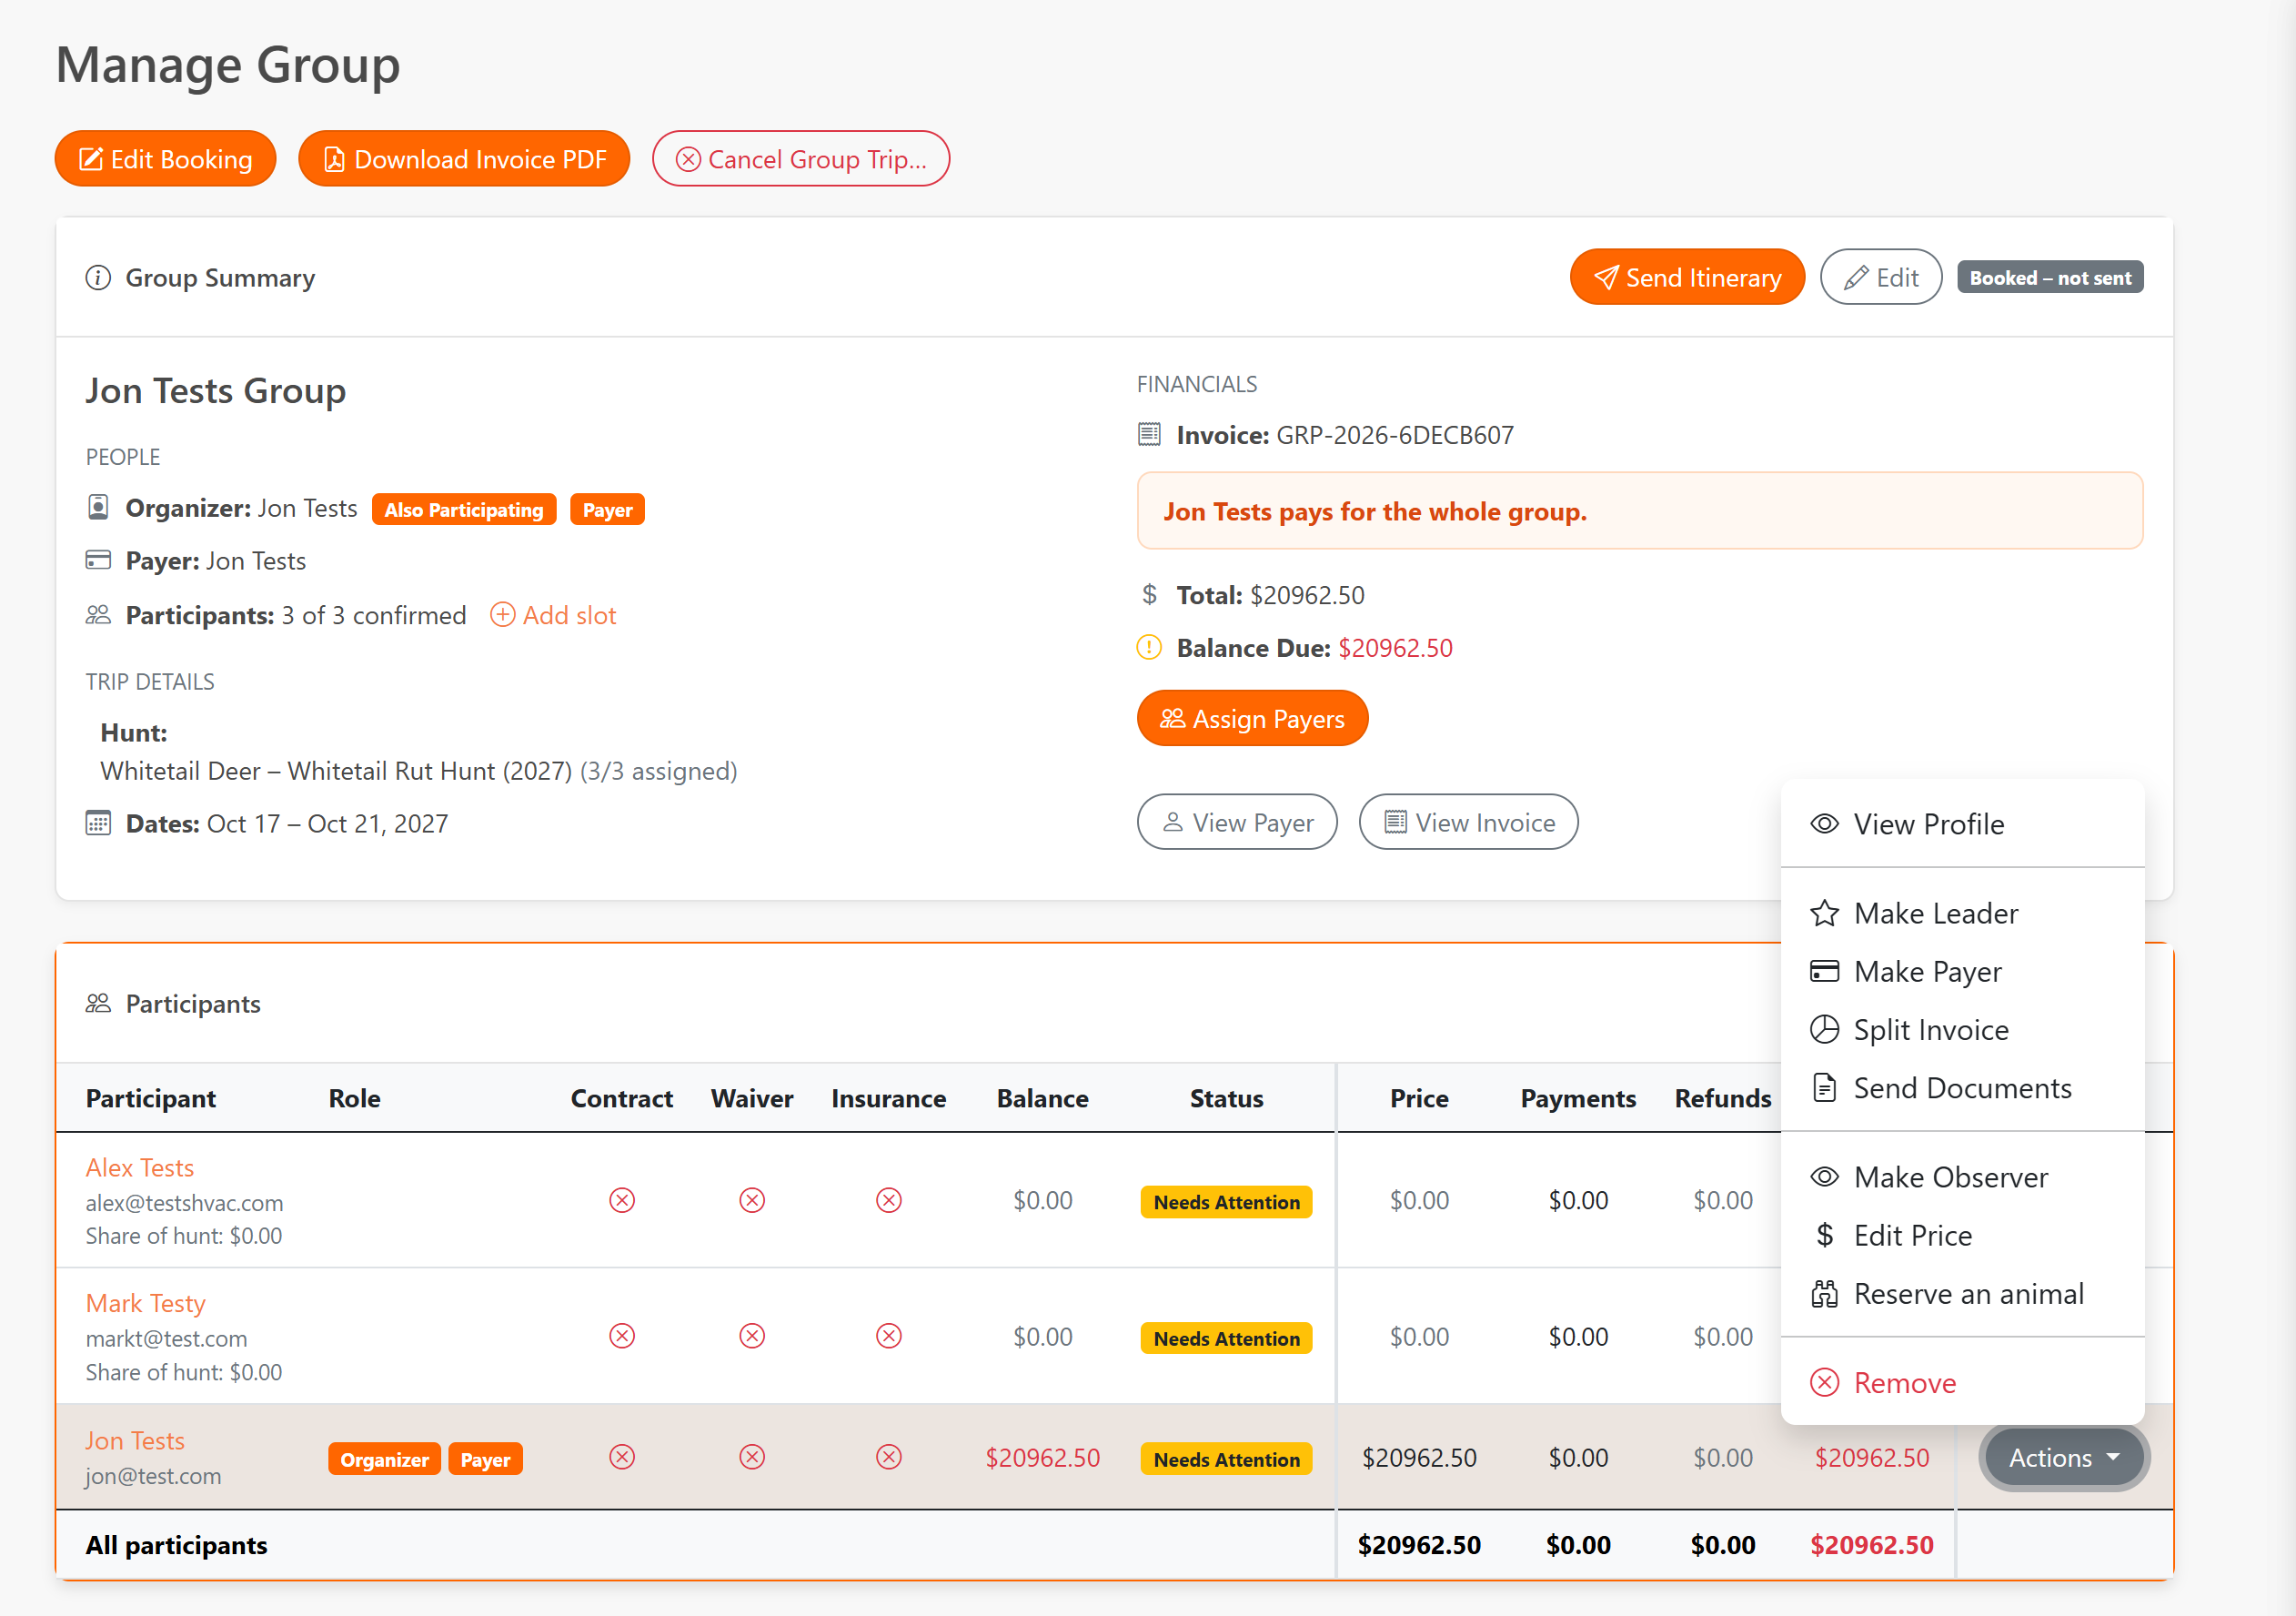
What Your Client Sees
- Observer receives — A booking email that says "You're traveling with [client name]." If the observer is self-pay with a fee, the email includes an invoice and a Pay Deposit link.
- The booked client receives — The booking email shows "Traveling with: [observer name]" so they know their companion is confirmed.
- No $0 invoice — If there's no fee, or if the client pays, the observer does not receive a blank $0 invoice.
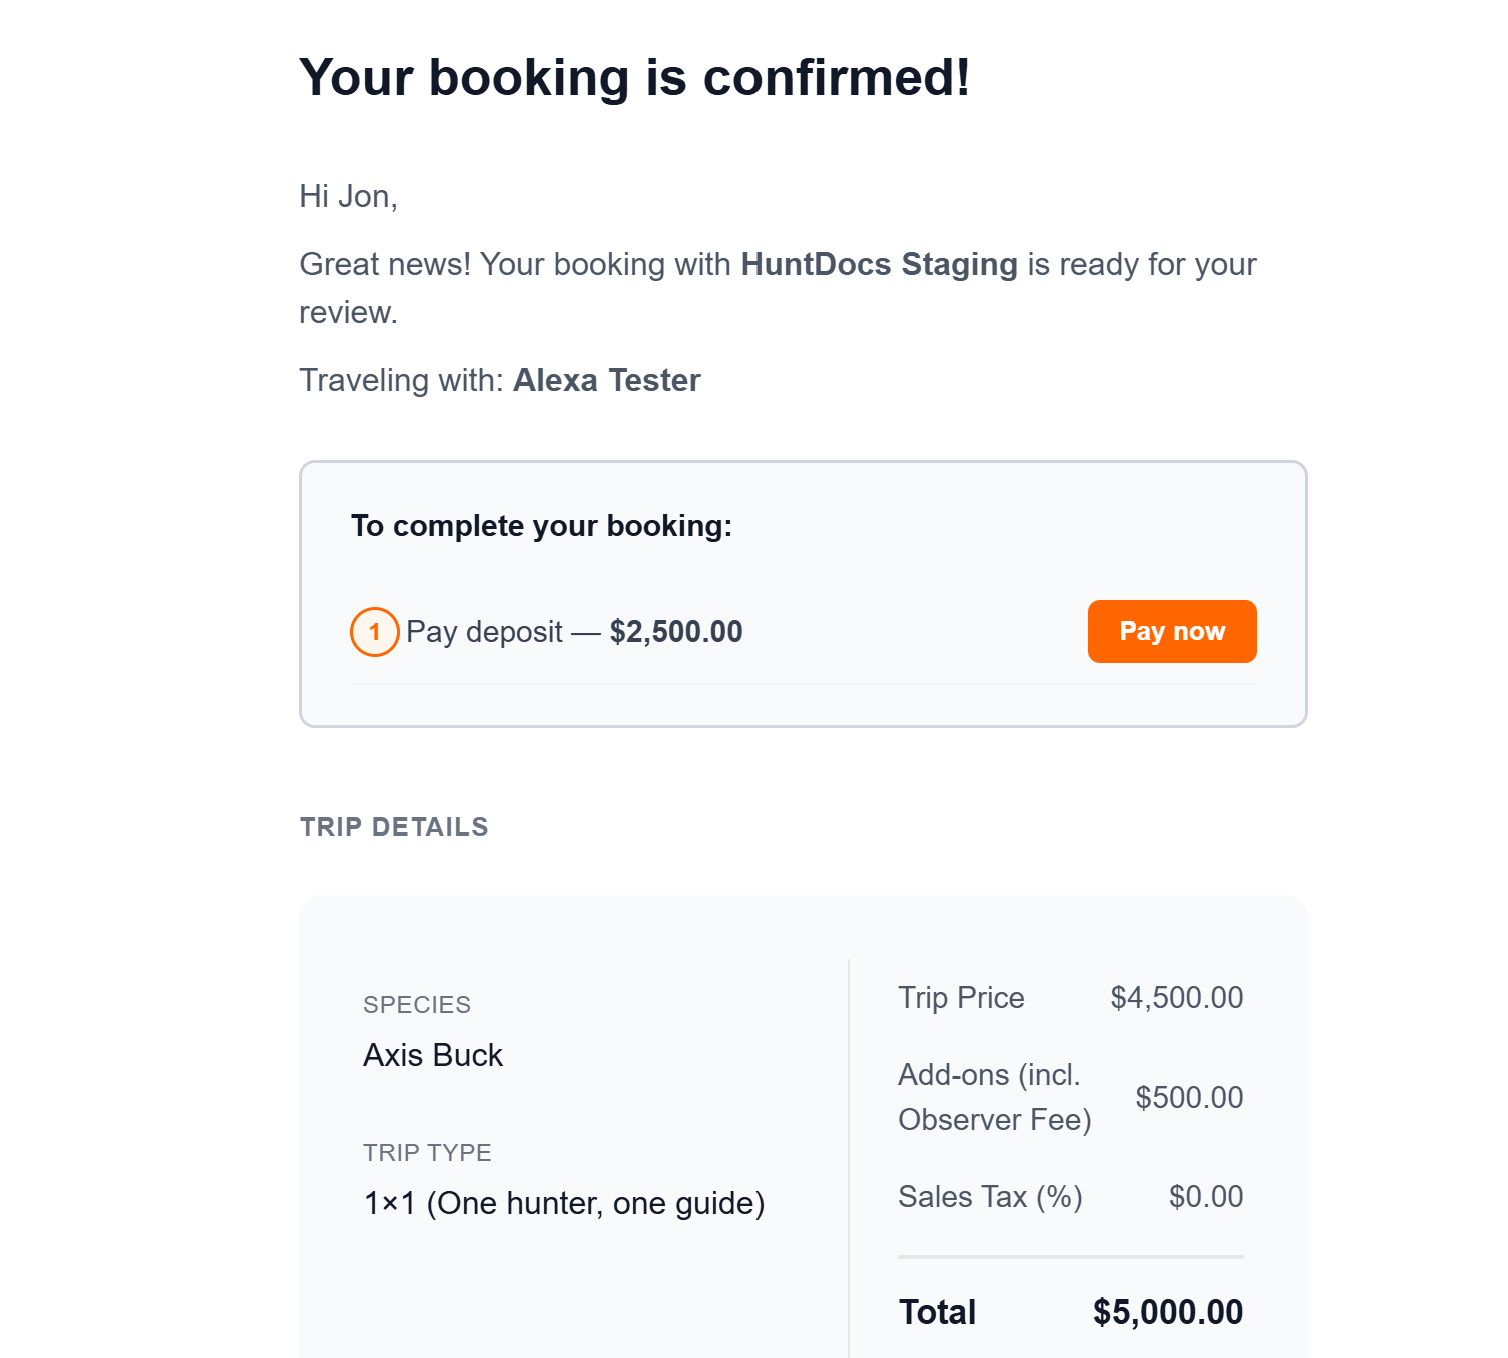
Where Observers Appear
- Calendar — Observers appear in the party summary when you click on a booking. They do not get their own calendar bar.
- Scheduled Trips — The client's row shows "w/ [observer name] Observer" so you see the full party at a glance.
- Guide Brief / Staff Portal — Guides see the observer listed alongside the hunting party.
- Manage Group — Observers appear in the participant table with an Observer badge. They are excluded from the assigned hunt slot count.
- Invoices — Hunter-pays observer fees appear as a line item on the client's invoice (or the group invoice). Observer-pays fees appear on the observer's own invoice.
- Accounting — Self-pay observers with a fee appear in the Observer Trips card in the Accounting section.
Important Notes
- Observers do not count toward hunt capacity or assigned slot counts.
- You can add multiple observers to a single client's booking.
- If you add an observer from a client's detail page and that client is part of a group, the observer automatically appears on the Manage Group page too.
- Observer fees support quantity/days — enter a per-day rate and number of days, and the total is calculated automatically.
- Removing an observer from the client detail page also removes them from the group if applicable.
Assign Payers — One Invoice per Payer on a Group Hunt (early access)
On a group hunt, one person doesn't always pay for everyone. Assign Payers lets the group organizer (or you) set who pays for whom — one person can pay for several spots — and HuntDocs splits the group invoice into one invoice per payer. Each payer gets their own email with their invoice, a deposit pay button, and the trip documents. You see the whole arrangement on Manage Group.
How It Works
Assigning payers only decides who is responsible for which spots — it never changes any prices. Each spot keeps the price you set when you booked the trip. Any spot that isn't handed to a payer stays on the organizer's own invoice, so nothing is ever left unbilled.
The Organizer Sets It Up from Their Group Dashboard
- Open the Group Dashboard — The organizer uses the link in their booking email. Who pays for this trip? is a step in their getting-started checklist, placed before the deposit so the right people pay from the start.
- Tap anyone to change who pays for them — The screen shows each payer's pile of spots with its total. Tapping a participant opens a picker to hand their spot to someone else — or take it back.
- Click Send the invoices — The moment the organizer confirms, each payer is emailed their own invoice. The screen states exactly who will get an invoice before they commit.
Setting It Up Yourself from Manage Group
- Open the group's Manage Group page — Click Assign Payers.
- Make the assignments — Same screen the organizer sees: piles per payer, tap to reassign.
- Confirm — The payer invoices are created and emailed, and Manage Group updates to show the arrangement.
What Each Payer Receives
- An email naming the organizer — "[Organizer] set you as the payer for these spots" — with each covered spot and its amount listed.
- A deposit pay button — If the trip has a percentage deposit, their share is calculated from their own invoice and payable right from the email.
- A link to their invoice — Their invoice shows only their spots, with each participant named.
- The trip documents — Same as a regular booking email.
What You See on Manage Group
- Who pays, in plain words — A sentence summarizing the arrangement, plus an invoice list showing each payer, who they pay for, and their balance.
- Payer badges on the roster — Payers are marked, and covered participants show "[Payer] pays" instead of a balance of their own.
- Payments land on the right invoice — When a payer pays, only their invoice's balance moves. The organizer's dashboard shows the same truth.
- QuickBooks — Each payer's invoice syncs separately, with the covered participants named on the line items.
Automatic Reminders
If you use automatic reminders, payment reminders go to each payer for their own invoice — not just the organizer. Document reminders still go to the organizer. Every send is logged on the client's Messages tab.
Important Notes
- Locked by the first payment — Once any payment is made on the group, who-pays can no longer be changed. Set it up before collecting money.
- Before any payment, it can be changed freely — The organizer uses Change who pays on their dashboard; you use Assign Payers on Manage Group. Reassigning replaces the old invoices with new ones.
- Who can be a payer — Any group participant with an email address. Minors and participants without an email can't be payers (they can still be paid for).
- Percentage deposits split automatically — Each payer's invoice carries its own deposit. A fixed-dollar deposit does not divide — each payer's invoice simply shows its balance, and you handle the deposit arrangement directly.
- Observers — An observer fee billed to their client rides that client's spot. Self-pay observers can be assigned a payer like anyone else.
Cancelling a Trip (Without Losing Your Records)
When a client backs out, cancel the trip instead of deleting it. Cancelling opens the spot back up, stops reminders, and settles the paperwork — but keeps every record: the booking, the invoice, the payment history, and the signed documents all stay on the client's page, marked Cancelled. You decide what happens to any money they've paid, and you can un-cancel later if plans change.
Cancelling One Client's Trip
- Open the client's page and go to the Hunts tab — Find the trip you need to cancel.
- Open the trip's menu and choose Cancel Trip… — A window shows exactly what will happen before you confirm.
- Decide what happens to any money paid — For each payment on the trip, pick one:
- Refund it — The money goes back to the client.
- Keep it — The money stays with you (a kept deposit, for example).
- Decide later — The money is set aside and stays visible on the client's page until you choose. A banner reminds you it's waiting.
- Add a note if you want — It's saved to the client's history, so next season you'll remember why.
- Click Cancel Trip — The button stays off until every payment has a decision, so money is never left in limbo by accident.
Cancelling a Whole Group's Trip
- Open the group's Manage Group page — Use Cancel Group Trip… at the top.
- Make a money decision for each payment — Same choices as a single trip: refund, keep, or decide later, per payment.
- Confirm — Every member's booking is cancelled together, and the group invoice settles so nothing more shows as due.
Removing or changing one member of a group is different — that's done with the group's editing tools, and it never cancels the rest of the group.
What Cancelling Does
- The spot opens back up — Cancelled trips don't count against your hunt's capacity.
- Reminders stop — Payment and document reminders end, and any open deposit request for that trip is cancelled automatically.
- Schedules clear — The trip comes off your calendars, staff schedules, and reports.
- The invoice settles — The trip stays on the invoice marked Cancelled, billing nothing. Money you kept shows on its own line, so the total and balance stay honest.
- Nothing is erased — The booking, payments, and documents stay on the client's page for your records.
QuickBooks Is Handled for You
- If nothing was paid, the QuickBooks invoice is voided.
- If you keep money, the QuickBooks invoice is updated to show the kept amount, paid in full — nothing shows as still owed.
- If you refund, a refund receipt is added in QuickBooks.
- Each cancel window tells you in plain words what QuickBooks will do before you confirm.
Changed Your Mind? Un-cancel
- Open the cancelled trip's menu and choose Un-cancel Trip… — For groups, use Un-cancel Group Trip… on the Manage Group page.
- The booking comes back at the right stage — Confirmed if a deposit was received, Pending if the package was sent, otherwise Draft. It takes its spot on the hunt again, and reminders resume.
- Money doesn't change — Refunds stay refunded and kept money stays kept. If the client is re-paying, handle that as you normally would.
Cancel vs. Remove
Remove erases a booking completely, so it's only for cleaning up a mistake — and it's only offered while nothing has been sent to the client and nothing has been paid. Once a package has gone out or money has come in, Cancel Trip is the path, so your records and QuickBooks stay right.
What Your Client Sees
- HuntDocs does not email the client when you cancel — you stay in control of that conversation.
- If they open their invoice, the cancelled trip shows marked Cancelled and bills nothing; any money you kept is shown honestly.
- Old payment links for the cancelled trip stop working — a client can't accidentally pay for a trip that's off.
Important Notes
- "Decide later" money stays visible — A banner on the client's page (and the group's invoice) shows the amount waiting on a decision, with a Resolve button to refund or keep it when you're ready.
- Older card payments may be too old to refund in HuntDocs — If a payment is past the refund window, refund it directly in Stripe if needed.
- Booking the same client on the same hunt again revives the cancelled trip as a fresh draft — you won't end up with duplicates.
- Un-cancelling into a full hunt — If the spot was rebooked in the meantime, the hunt shows as over-booked in red so you can sort it out.
Edit a Booking: Change Dates, Prices, or the Whole Week
Plans change — a client moves their dates, the price gets reworked, or they switch to a different week entirely. Edit & Resend Booking Email reopens the whole trip in Trip Builder so you change what needs changing, and the invoice, documents, and payments ride along with the booking.
Editing a Trip
- Open the Client's Record — "Clients" → "Client List," open the client, then the "Booked Hunts" section.
- Click "Edit & Resend Booking Email" — On the trip card. The full trip loads back into Trip Builder.
- Make Your Changes — Dates, price, trip details, staff, documents, services, discounts — anything you could set at booking time.
- Moving to a Different Week or Hunt? — Remove the old hunt from the trip and add the new one in the same edit. HuntDocs treats that as a move: the booking, its money, and its documents transfer to the new hunt.
- Click "Update & Send" — Saves the changes and sends the client their updated confirmation.
What HuntDocs Handles for You
- Capacity is checked — Moving into a week that's full warns you before you overbook, exactly like a new booking.
- Money stays safe — If you remove a hunt the client has already paid toward, HuntDocs asks what to do with each payment — refund it, keep it, or decide later. Nothing disappears silently.
- The invoice updates — Price and line-item changes flow straight through.
What Your Client Sees
The updated booking confirmation when you click Update & Send — new dates, new details, same booking. Nothing sends until you do.
Important Notes
- Group members are edited from Manage Group — structural changes to someone on a group trip (their hunt, their spot) belong on the group's page, so the group stays consistent.
- Calling the trip off entirely? — That's Cancel Trip, not an edit (see Cancelling a Trip).
Public Trip Calendar: Show Your Trips on Your Website (early access)
The Public Trip Calendar is a live, embeddable calendar of your upcoming trips that you drop straight onto your own website. Visitors browse your dated trips, color-coded by experience category, filter by species or trip type, and either book online or get pointed to your contact info — all without leaving your site. You choose exactly which trips appear.
Finding It
Once it's enabled, open Public Calendar from the left-hand menu (it also appears under your Settings list). The page has two halves: on the left, a live preview and the code to add it to your website; on the right, the list of trips with an on/off switch for each.
Choosing Which Trips Show
- Find the trip in the right-hand list — Every upcoming, dated, unarchived trip is listed, grouped by date. Use the Search box or the Year, Species, and Experience filters to narrow a long list.
- Flip the switch on — Each trip has a toggle. Switch it on to show that trip publicly; switch it off to hide it. The preview on the left refreshes instantly so you can see exactly what visitors will see.
- New trips start hidden — When you create a new trip with dates, it joins this list automatically but switched off, so nothing goes public until you decide it should.
Adding It to Your Website
- Copy the embed code — In the Add to your website card, click Copy embed code. (Prefer a plain link to the full-size calendar? Use Copy link instead.)
- Paste it where you want the calendar — Drop the code into any page on your site. Most website builders have a "custom HTML" or "embed" block for exactly this.
- It's a one-time setup — Once the code is on your site, the calendar stays in sync on its own. Send the snippet to whoever manages your website if you don't edit it yourself. After that, turning trips on and off here is all you ever need to do.
What Each Trip's Tag Means
- Books online — Visitors can book and pay a deposit right from the calendar. This follows each trip's Enable Online Booking setting.
- Contact to book — Online booking is off for that trip, so visitors see your contact info instead of a checkout.
- Waitlist — The trip is sold out, so bookable trips switch to collecting waitlist interest.
The colored dot beside each trip is its experience category (Guided, Drop Camp, and so on), which is what color-codes the public calendar and powers the visitor's trip-type filter. See Experience Categories below for how those are set.
Seeing What's Working
The Last 30 days card shows how prospects are using the calendar: calendar views, trip opens (people clicking into a trip for details), and book clicks. It also surfaces which trip is drawing the most interest, so you can see what your audience is after.
Important Notes
- Only upcoming, dated, unarchived trips can appear. A trip without dates won't show up in the list until you add them.
- Calendar visibility and online booking are separate. A trip can show on your public calendar without being bookable online, and a trip can be bookable without being on the calendar.
- Nothing here changes pricing, invoices, or existing bookings — it only controls what prospects see on your website.
Availability Calendar: What's Open, at a Glance
When a client calls asking "what do you have open in October?", the Availability Calendar is the answer screen — every offering laid out by date with how many spots are booked and how many remain, so you can sell the open seat while they're still on the phone.
Using It
- Open "Availability" — In the Booking & Scheduling strip at the top of any page.
- Pick the timeframe — Year and month controls move you through the season.
- Filter to what the caller wants — Species, Experience type, and Guide Ratio narrow the view.
- Read the counts — Each offering shows how many spots are booked out of its total; full hunts are marked so you don't oversell.
Important Notes
- Counts follow your real bookings — every committed booking takes a spot; cancelled trips give theirs back automatically.
- This is your internal view — the prospect-facing version for your website is the Public Trip Calendar (see below).
- Capacity comes from each offering — set the number of spots on the hunt itself (Hunts → edit the offering).
Scheduled Trips: Every Booked Trip in One List
Where the calendars show your season as a picture, Scheduled Trips shows it as a worklist — every booked trip as a row with its dates, staff, and balance, filterable down to exactly the slice you're working on.
Using It
- Open "Hunts" → "Scheduled Hunts" — From the left-hand menu.
- Filter to your slice — Year, month, trip, camp, guide, category, weapon, hunt unit, land area — or search a client by name.
- Read the rows — Dates, hunt, unit, staff assigned, price, and balance for every booked trip.
- Act from the row — View Client jumps to their record; Send Documents sends paperwork without leaving the list.
Good Uses
- "Who's in camp in September, and who still owes money?" — filter month, scan the balance column.
- "Which October trips still have no staff assigned?" — filter month, scan Staff Assigned.
Important Notes
- Cancelled trips don't appear — this list is your live season.
Client Calendar: See Every Booking on One Schedule
The Client Calendar is your master booking schedule — a month-at-a-glance grid of every hunt you have on the books. Each booking shows as a bar across its dates, labeled with the client's name, so you can see who's in camp and when at a glance. It's an internal scheduling tool for you and your team, not a public page.
Finding It
Open Client Calendar from the Booking & Scheduling strip at the top of any page (the row that also holds Availability and Staff Calendar). It's always available.
Reading the Calendar
- Each booking is a bar — A hunt spans its start-to-end dates, labeled with the client's name. A group booking shows as a single bar for the group; observers aren't given their own bar.
- Blocked dates show too — Days you've marked off — Vacation, Do Not Schedule, Training, Personal — appear as their own color-coded bars. The legend below the grid explains every color.
- Moon phase — Each day shows its moon phase, handy for planning around the hunt.
- Click a booking — Jump straight to that client's details from their bar.
Blocking Off Dates
- Click Block Dates / Add Time Off — A window opens for the details.
- Pick the range and type — Choose the dates and what they are (Vacation, Do Not Schedule, Training, Personal), add a note if you like, and save. The dates appear as a bar so the whole team can see the camp is unavailable.
Finding the Right Trips Fast
Use the month and year controls (or the Today button) to move around, and narrow the view by Species, Camp, or Guide, or Search by a client's name or email. You can also set how weeks read (Sunday–Saturday, Monday–Sunday, or Saturday–Friday) and print the month.
Sync It to Your Own Calendar
Click Sync to Calendar to add your bookings to Google, Apple, or Outlook. Copy the calendar link, subscribe to it once in your calendar app, and every hunt and blocked date flows in — when you add, change, or remove a booking, your calendar app picks it up on its next refresh. Your calendar app decides how often that is: Apple and Outlook check about once an hour, while Google usually takes 12–24 hours. It's a read-only mirror; you still manage bookings here in HuntDocs. If a change still hasn't appeared after a day, see Calendar Sync Isn't Showing My Changes below.
Important Notes
- Only bookings with dates appear. A hunt without a start and end date won't land on the calendar until you set them.
- This calendar is internal. It's not the public, website-facing calendar — for that, see Public Trip Calendar above.
Calendar Sync Isn't Showing My Changes
You changed a booking in HuntDocs — moved dates, renamed a hunt, cancelled a trip — but your Google, Apple, or Outlook calendar still shows the old version. Here's why, and how to force it to catch up.
First, Give It Time
Your calendar link is always current — HuntDocs rebuilds it from your account every time it's opened. The delay is on your calendar app's end, because it keeps its own copy and only checks for a new one now and then. Apple and Outlook check about once an hour. Google usually takes 12–24 hours, and there's no "refresh now" button for a subscribed calendar. If the change is only a few hours old, it will almost certainly arrive on its own.
If It's Been Longer Than a Day (Google)
Google files its saved copy under the exact web address you gave it. Deleting the calendar and pasting the same address back in hands Google an address it already has on file, so it may show you its saved copy again — which is why re-adding it often doesn't help. The fix is to give Google an address it hasn't seen before:
- Copy your calendar link — On the Client Calendar, click Sync to Calendar and copy the link.
- Add
?v=2to the very end — Paste the link somewhere you can edit it and type?v=2right afterfeed.ics, with no spaces. It should end withfeed.ics?v=2. This points at exactly the same calendar — it just looks new to Google. - Delete the old calendar in Google — Hover the HuntDocs calendar under "Other calendars," click the ⋮ menu, and choose Unsubscribe. Do this first, or you'll end up with two copies of every hunt.
- Add it back with the new link — Click the + next to "Other calendars," choose From URL, paste your edited link, and click Add calendar.
- If you ever need to do it again — Use
?v=3next time, then?v=4. Any number Google hasn't seen works.
Checking the Link Yourself
You can confirm HuntDocs is publishing the change: paste your calendar link straight into a browser address bar. It downloads a plain text file listing every booking. If your change is in that file, HuntDocs is doing its job and the hold-up is your calendar app's refresh.
Important Notes
- The link is private — Anyone with it can see your bookings. Don't post it publicly or share it outside your team.
- Some changes never appear, by design — The calendar carries client names, species, hunt names, dates, group and unit details, and your notes. It does not carry guide assignments, camps, lodging, payments, or documents. If you changed one of those, it was never going to show in Google.
- Cancelled trips drop off — A cancelled booking leaves the calendar on the next refresh, on the same schedule as any other change.
- Check which account you're in — If you have more than one HuntDocs account, each has its own calendar link. Changes made in one account won't appear in the other account's calendar.
Staff Calendar: Schedule Your Staff
The Staff Calendar is the staff-side view of your schedule — every guide, cook, wrangler, and packer laid out so you can see who's working which hunt and who's off. Assign staff, move assignments around, and catch scheduling conflicts before they happen.
Finding It
Open Staff Calendar from the Booking & Scheduling strip at the top of any page (it also appears as Staff Schedule in your left-hand menu).
Reading the Calendar
- Each staff member has a row — Their assignments show as bars across the dates they're working, alongside any approved time off.
- Two views — Month gives you the big picture; Week is a closer Gantt-style view where you can drag and resize assignments to change their dates.
- Time off is visible — Approved vacation and blackout dates appear so you don't schedule someone who isn't available.
Assigning Staff to a Hunt
- Assign right from the calendar — Add a staff member to a hunt without leaving the schedule, then drag or resize the bar to fit the dates.
- Conflicts are flagged — If an assignment overlaps another assignment or approved time off for that person, HuntDocs warns you so no one gets double-booked.
Staff Schedules on Their Phones
Each staff member has a personal calendar feed they can subscribe to in Google or Apple Calendar, so their assignments show up on their own phone and stay in sync as you make changes. (If a staff member has a login, they also get a My Schedule view in their portal.)
Important Notes
- This is the staff schedule. To see client bookings, use the Client Calendar above.
- Time off has to be approved before it blocks scheduling — a pending request won't stop an assignment on its own.
The Photo Gallery
The Photo Gallery collects your outfit's photos in one place — uploads from you and your guides, each one showing who added it, which client it belongs to, and the species. Clients have a gallery view of their own inside the client portal.
Where Photos Come From
- The harvest form — When you or a guide record a harvest on a client's trip, you can add photos right there. They land on the client's record, in this gallery, and in the client's portal, tagged with the client, the species and the outcome.
- A guide's Gallery page — Guides pick who a photo is for: one of the people on their trips, or your gallery with no client. A client's photo goes to their portal as soon as it's added, and you get one notification per upload.
- The client record — The Photos card on any client's record. Uploading there shares the photo with that client.
Finding a Photo
- Open "Photo Gallery" — From the left-hand menu, on the Hunt Photos tab.
- Search — By a client's first or last name (or both), by species, and by year and month. The date is the day the photo was taken, read from the phone, so a photo added weeks later is still found under the day of the hunt.
- Act on what you find — Tick photos, then share them with a client or delete them. A photo can be shared with any number of clients without making copies.
Good to Know
- The client record's Photos card shows who added each photo, a switch to share or take back, Delete, and "Add to another client".
- A guide removing a photo from their own gallery changes nothing for you or the client — you keep the photo.
- Deleting a harvest record keeps its photos; they stay on the trip and in the gallery.
Trail Camera Photos
If Trail Camera Photos is turned on for your account, the Photo Gallery gains a Trail Camera tab: upload a whole SD card's photos at once and share them with booked clients, so they can see what's been moving on the ground they're hunting — without giving away where your cameras sit.
Uploading
- Open "Photo Gallery" — From the left-hand menu, then the Trail Camera tab.
- Accept the trail camera terms — Once per person, before the first upload.
- Click "Upload Photos" — Select as many files as you like; they upload in small groups with a running count, and thumbnails appear as each photo is prepared.
- Share — Tick photos (or filter, then "Select all"), pick one client or Everyone with a live booking, and click Share.
What the System Does
- Location never travels — GPS and other identifying data is stripped from every photo at upload.
- Camera names can be hidden — Turn on Hide camera names from clients and the name printed on each photo is blacked out; the date, time and temperature stay. Turn it off and the names come back.
- Clients get one text — When you share, each client gets a single "new photos" text with a link straight to their photos. STOP requests and quiet hours are honored automatically.
- Access ends on its own — Trail camera photos leave a client's portal 30 days after their hunt. Your gallery keeps everything.
- Guides can upload too — Their photos wait, unshared, and you get one notification per upload. You decide what clients see.
What the Client Sees
- Trail camera photos in their portal gallery, grouped by season, view-only — no download.
- A note that the photos are not a guarantee of what they'll see on their hunt.
Important Notes
- Private land only — Don't upload trail camera photos taken on public land; many states restrict trail camera use, and the rules change by season.
- A client's harvest photo is different — Use Move to Hunt Photos when a client takes the animal that was on camera: the photo stops expiring and becomes downloadable for them.
- Delete removes it everywhere — Deleting a photo takes it out of every client portal that has it, permanently.
Land Use Tracking & Agency Reports
If you operate on National Forest, BLM, or other permitted ground, HuntDocs helps with the paperwork the agencies want: record land use on each trip as it happens, and pull season reports instead of reconstructing the year from memory.
Recording Land Use on a Trip
- Open the trip card — On the client's page, under Booked Hunts.
- Find the "Land Use Tracking" panel — On the trip card.
- Record the entry — Land designation and usage type for that trip's days.
The Reports
- Operating Plans — Under NF/BLM Reports in the left menu: ready-made Personnel, Guides (license numbers, expirations, CPR/First Aid), Transportation (vehicles, plates), and Certifications tables, filtered by land area and year, with Export and Print PDF. Built to help you prepare a National Forest or BLM operating plan.
- Certification packet — The Certifications table shows Guide License, CPR / First Aid, and NF Leave No Trace status: expiration dates and whether a document is uploaded or missing. Choose who's included: the guides assigned to a land area for the year, or your whole active staff (no land area needed). Download Packet builds one PDF with that table plus each person's newest uploaded certification file. Email Packet sends the same PDF to the address you enter (your forest or BLM office), CCs an exact copy to your own account email, and records the send in Communications Tracking.
- Use reports — Season use summaries (forecast and actual) drawn from the land use you've recorded on trips.
Important Notes
- The reports are only as good as the records — staff license and vehicle data comes from your staff records (see Add a Staff Member), and use data from the trip cards. Keep both current and report season is painless.
- Your agency's exact form still rules — these reports organize your data to prepare the filing; check them against your permit's requirements.
Turn On Staff Management
The Staff module lets you track your staff — guides, spotters, wranglers, cooks, packers, and camp jacks — assign them to hunts, schedule them, and (optionally) track their pay. Turn it on once in Settings and the Staff menu appears in your navigation.
Enable the Module
- Go to Settings — Click your profile icon in the top right and select "Settings."
- Find the Staff Module card — Scroll to the section titled "Staff Module."
- Flip the toggle to Enabled — This turns on the Staff menu (Staff Schedule, Staff List, Add Staff, and Invite Field Staff) across HuntDocs.
- Choose Field Visibility — Use the checkboxes to control which fields show on your staff records, so you only track what matters to you.
- Save your settings — Click Save to apply.
Optional Staff Add-Ons
- Enable Pay Tracking for Staff Assignments — A checkbox inside the Staff Module card. When on, each assignment can carry pay and become a Staff Invoice, and a "Staff Invoices" link appears in the Staff menu. See Staff Pay Tracking & Staff Invoices below.
- Enable Manager & Teams Module — Found in the Manager settings. Lets you give a manager oversight of a subset of your guides. Adds a "Teams" link to the Staff menu. See Managers & Teams below.
- Guide Briefs — A toggle that lets you share a trip brief with the assigned guide. See Guide Briefs below.
Add a Staff Member
Create a record for each member of your staff so you can assign them to hunts, schedule them, share briefs, and track their pay.
Adding Someone
- Open the Staff menu → Add Staff — From the left-hand menu under Staff.
- Enter their details — Name, contact info, and their role (Guide, Manager, Spotter, Wrangler, Cook, Packer, or Camp Jack).
- Add licensing and specialties (optional) — Record a guide license number and expiration, CPR / First Aid status, vehicles, and species specialty. You control which of these fields appear from the Staff Module settings.
- Save — The new staff member appears in your Staff List.
Certifications
- Three certification cards — The staff detail page has a Certifications section with a card for CPR / First Aid, Guide License, and NF Leave No Trace. Each shows a Valid, Expiring Soon, or Expired badge based on its expiration date.
- Set the expiration date — Type or pick the date on the card and click Save. Clearing the date and saving removes it.
- Upload the card or certificate — Click Upload on Behalf to attach a photo or PDF of the document. Staff with a login can also upload their own from their My Info page.
Managing the Staff List
- Staff List — Open Staff → Staff List to see everyone on your staff. Click a person to open their detail page.
- Edit anytime — Update contact info, role, licensing, and pay defaults from the staff detail page.
- Deactivate instead of delete — If someone leaves, you can mark them inactive so they drop off scheduling without erasing their history. Deleting removes the record entirely.
Export Your Staff List
Need your staff roster outside HuntDocs — for an agency form, an insurance renewal, or a printed camp list? Download it straight off the Staff List.
- Open Staff → Staff List — The Export button sits at the top of the list, next to Add New Staff Member.
- Narrow the list first (optional) — Search by name or email, filter by specialty or unit, or tick Show Inactive Staff. The download matches exactly what the page is showing.
- Choose Download CSV or Download PDF — CSV opens in Excel or Google Sheets. PDF is formatted to print or email as-is.
- What's included — First name, last name, role, email address, phone number, and specialty, one row per person.
- Inactive staff are left out — Unless you tick Show Inactive Staff before downloading.
Give Your Staff a Login (Invite Field Staff)
Invite a staff member to create their own account so they can log in to the Staff Portal — see their schedule, express interest in open hunts, request time off, and view their briefs and documents.
Sending an Invite
- Open Staff → Invite Field Staff — This opens the "Invite Field Staff Member" window.
- Enter their email address — Type the email where the invitation should go.
- Click Send Invitation — The recipient gets an email with instructions to create their account.
- They register — When they finish signing up, their login is linked to their staff record automatically, and they land in the Staff Portal.
What a Logged-In Staff Member Can Do
- My Schedule — See their own assignments and approved time off.
- Opportunities — Browse open hunts and tap "I'm Interested."
- Time Off — Request vacation or blackout dates for your approval.
- Documents & Briefs — View documents you've shared and any hunter briefs for their assignments.
Assign Staff to a Hunt
Put a staff member on a hunt with a role and dates. HuntDocs tracks the assignment on the Staff Calendar, warns you about conflicts, and (if pay tracking is on) can turn it into a Staff Invoice.
Three Ways to Assign
- From Trip Builder — While building a booking, open Trip Details → Assigned Staff, pick the person and role (Guide, Manager, Spotter, Wrangler, Cook, Packer, or Camp Jack), set their start and end dates, and click Add. See the Book a Hunt or Trip (Trip Builder) topic.
- From a client's booking — Open a client's page and assign a staff member to their hunt. You can edit the role, adjust dates, add a note, or remove the assignment later.
- From the Staff Calendar — Assign a staff member to a hunt right from the schedule, then drag or resize the bar to fit the dates. See Staff Calendar above.
Working with someone who isn't tied to a hunt — a cook or housekeeper booked for a stretch of days? Use Assign Dates instead; see the next topic.
Conflicts Are Caught for You
- Overlapping assignments — If a person is already assigned to another hunt on those dates, HuntDocs flags it so no one gets double-booked.
- Approved time off — Assigning someone over their approved vacation or blackout dates raises a warning too.
- Interested staff — If staff expressed interest in the hunt, you'll see who — handy when deciding who to assign.
Assign Dates: Cooks, Housekeepers & Other Non-Guide Work
A guide works a trip. A cook or housekeeper works a stretch of days — they might feed one client or twenty, and you may not even know who the guests are yet when you schedule them. Assign Dates puts a staff member on a date range with no trip attached, pays them for the period, and lets them invoice you for it.
Step 1: Set Their Rate
- Open the staff member's record — Go to Staff, click the person, and open Pay Settings.
- Add their role if it isn't there — Pick the role (Cook, Housekeeping, Wrangler, and so on) and click Add role.
- Fill in the "Any dates (no hunt)" line — It's the highlighted row at the top of the role's table. Enter the rate and pay type (usually Daily), then Save pay settings. For a cook or housekeeper, that one line is normally the whole setup — the species rows below it are for work on a trip.
Step 2: Assign the Dates
You'll find the orange Assign Dates button in three places: on the staff member's record, on the Staff Calendar, and on a client's Hunts tab beside where you assign a guide.
- Pick the person and role — Their role fills in automatically; change it if this stretch is different work.
- Pick the start and end dates — The pay fills in from the rate you set, so you can see the total before you save.
- Choose "Where" if you use Lodging — Optional. Naming a property tells the person which lodge they're working and scopes what they see (see below). Leave it blank if they cover more than one.
- Answer "Who are they taking care of?" — Two choices, side by side: Not tied to specific clients (they work those dates for whoever is booked — pick this when you don't know the guests yet, or never will) or Choose clients, which lists everyone with a trip in those dates so you can tick exactly who. Use the second one when two camps run the same week and each has its own cook.
- Save Assignment — If you use assignment confirmations, they're asked to confirm by text, the same as guides.
What the Staff Member Sees
In their portal the work shows as a normal trip card — for example "Cook · Sep 20 – Sep 27" — with the pay, and:
- The people they're taking care of — If you picked clients, each name appears with that client's own arrival and departure, so mid-week changeovers are obvious.
- A headcount if you didn't — The card reads "Booked those dates: 12 clients" and updates on its own as bookings come in — enough for a cook to plan meals.
- Check-ins and check-outs, if you use Lodging — For a housekeeper, the card lists the actual work: which room, which day, checking in or out, and whose. It's read live from your lodging reservations, so it's always current.
- A Create Invoice button — It appears once the last day has passed.
Getting Them Paid
- One invoice for the whole period — Not one per client. They're paid the rate for the days worked whether they served one person or twenty, so the same day can never be billed twice.
- Same review you already use — It arrives in Staff Invoices, where you approve, reject with a reason, or mark it paid by check, cash, bank transfer, or however you actually pay them.
- Their trade on the invoice — The line reads "Cook services" or "Housekeeping services," not "Guide services."
Somebody Working Two Roles the Same Week
A person who cooks and cleans the same week is normal. Two ways to handle it:
- One assignment plus a supplement line — Add a supplement (for example "Housekeeping") under their Cook role in Pay Settings. They get one confirmation and one invoice with both pay lines broken out.
- Two assignments over the same dates — Assign them twice with different roles. HuntDocs won't call that a conflict, and they invoice each role separately at its own rate.
Important Notes
- No rate means no invoice — The assignment still saves, but they can't invoice until the "Any dates (no hunt)" rate exists for that role. HuntDocs warns you at save time when it's missing.
- Invoices need pay tracking on — Same switch as guide invoices: "Enable Pay Tracking for Staff Assignments" in your Staff Module settings.
- Two separate rate lanes — "Any dates (no hunt)" is used only for date assignments. Trip assignments keep using the species rows, so a guide's pay is untouched.
- Assigning the same role twice over the same dates warns you — That's a real double-booking. Different roles don't.
- To change one, remove it and assign again — Date assignments have a Remove button on the staff record.
Staff Opportunities: Let Your Staff Claim Open Hunts
Opportunities let staff members with a login raise their hand for hunts that still need staff — instead of you chasing everyone down. They express interest; you make the final call.
How It Works
- Open hunts appear automatically — Upcoming hunts that still have open staff positions show up under Opportunities for eligible staff. A hunt with all its positions filled drops off the list.
- Staff express interest — In their portal, a staff member opens Opportunities and clicks "I'm Interested" on a hunt (and can add a note). They can withdraw interest at any time.
- You see who's interested — Interested staff are surfaced when you go to assign — both in Trip Builder and on the Staff Calendar.
- You assign — You make the final assignment. Expressing interest never books anyone automatically.
Staff Time Off & Availability
Track when your staff is unavailable — vacation, blackout dates, training, or personal days — so you never schedule someone who can't make it. Approved time off blocks new assignments and shows on the Staff Calendar.
How Requests Flow
- A staff member requests time off — From their portal, they open My Schedule → Add Time Off, pick a type (Vacation, Blackout, and so on) and a date range, and submit. The request starts as Requested.
- You approve or deny it — Review the request and set it to Approved or Denied.
- Approved time off blocks scheduling — Once approved, those dates appear on the Staff Calendar and HuntDocs warns you if you try to assign that person during them.
Good to Know
- Only approved time off blocks work — A pending request won't stop an assignment on its own until you approve it.
- Time off shows alongside assignments — On the Staff Calendar, each person's approved time off appears next to their hunt bars so availability is obvious at a glance.
Guide Briefs (Hunter Briefs)
A guide brief packages the details a guide needs for a trip — the client, dates, and logistics — into one view you can share with the assigned staff member. On the staff side it appears as the "Hunter Brief."
Setting It Up
- Enable Guide Briefs in Settings — Turn on the Guide Briefs option so the feature is available on assignments.
- Enable the brief on an assignment — Each staff assignment can have its brief turned on, with a preset (Standard or Safety) that controls what's included.
- Share it with the guide — Share the brief so the assigned staff member can open it. Unshare it anytime to withdraw access.
What the Guide Sees
- A "View Full Hunter Brief" button — On the assignment in their portal, the guide opens the brief to see the trip's details.
- Only what you share — A guide sees a brief only for assignments where you've enabled and shared it.
Staff Pay Tracking & Staff Invoices
When pay tracking is on, each staff assignment can carry a pay rate and become a Staff Invoice you can review and pay. This keeps guide payroll organized and feeds your Financials profit-and-loss.
Setting Pay
- Set default rates with a Pay Template — Save default pay rates so new assignments start with the right numbers instead of typing them each time.
- Pay per assignment — Each assignment carries a pay type (Hourly, Daily, Per Hunt, Salary, or Per Species) and a rate, plus optional notes and add-ons.
- Rates for work that isn't a hunt — Each role card also has an "Any dates (no hunt)" line for staff scheduled by date instead of by hunt, like a cook or housekeeper. See Assign Dates: Cooks, Housekeepers & Other Non-Guide Work.
The Staff Invoice Lifecycle
- Submitted — A staff member's work becomes a Staff Invoice, which can include a tip amount, whether the hunt was harvested, and any add-ons or receipts.
- Approved or Rejected — You review the invoice and approve it or send it back.
- Paid — Mark it paid once you've settled up. Guide pay flows into your Financials profit-and-loss automatically.
Where to Manage Them
Open Staff Invoices from the Staff menu to see and review invoices across your staff. Individual pay settings and assignment pay live on each person's staff detail page under Pay Settings.
Managers & Teams
The Manager & Teams module lets you delegate oversight of part of your staff. A manager gets their own portal and sees only the guides you assign to them — useful when a head guide or camp manager runs a subset of your operation.
Setting Up a Team
- Create the manager as staff first — Add the person as a staff member with the Manager role, then head to Teams to grant them portal access.
- Open Staff → Teams — Click "Add Manager" to set them up.
- Assign guides to them — Add the specific guides this manager should oversee. You can add or remove guides from their team anytime.
What a Manager Sees
- Only their assigned guides — A manager sees the schedules and assignments for the guides on their team, and nothing outside it.
- Their own dashboard — Managers work from a dedicated manager portal separate from your full outfitter view.
The Staff Portal (Your Staff's Login)
When a staff member has a login, they land in the Staff Portal — a simple, focused view of just their own work. Here's what they'll find, so you can tell them where to go.
Inside the Portal
- Dashboard — Their home screen, with upcoming assignments and open opportunities at a glance.
- My Info — Their contact details, licensing, and profile.
- My Schedule — Their assignments and approved time off, plus a place to request more time off.
- Opportunities — Open hunts they can express interest in.
- Documents — Documents you've shared, plus any hunter briefs on their assignments.
- Invoices — If pay tracking is on, their pay and Staff Invoices.
Getting a Staff Member In
Send them an invite from Staff → Invite Field Staff (see Give Your Staff a Login). Once they register, their login is linked to their staff record and they're routed straight to their dashboard each time they sign in.
Show a Staff Member Every Client on Their Calendar
By default, a staff member with a login sees only their own assignments on their calendar. If you want someone — a head guide or camp manager, say — to see the whole schedule, you can turn that on for them one person at a time. It only changes what they see; it adds no ability to edit anything.
Turning It On
- Open the staff member's page — Go to Staff and click the person you want to give access to.
- Check the box in the Client Calendar section — Near the bottom of their details, tick "Let this staff member see every client on the Client Calendar."
- Save — That's it. It's off for everyone else until you check it.
What They'll See
- Their own trips, unchanged — Still on their calendar, still clickable with their assignment details.
- Every other client's trip too — All the other bookings on the schedule now show on the same calendar.
- A quick summary on any trip — Clicking a client's bar opens a short summary: who, dates, logistics, and readiness. No money and no editing — just visibility.
Experience Categories: Label Every Trip You Offer
Every offering now carries an experience category — Guided, Semi-Guided, Drop Camp, Unguided / DIY, Scouting Package, or Non-Hunt Experience — so your hunt list, filters, and calendars can tell your trips apart at a glance. Categories are labels: they don't change your pricing, your invoices, or anything about existing bookings.
The Six Categories
- Guided — A guide hunts with your client. The guide ratio (1×1, 2×1, 3×1) sets pricing, same as always.
- Semi-Guided — You provide real support — orientation, starting points, check-ins, camp staff — while clients hunt mostly on their own.
- Drop Camp — You pack clients into an established camp and pack them (and their game) back out. No guide during the hunt.
- Unguided / DIY — Access, tags, or logistics only. Trespass-fee and landowner-tag hunts live here.
- Scouting Package — Pre-hunt intel sold as its own product: marked maps, pins, trail-cam updates.
- Non-Hunt Experience — Horseback rides, fishing trips, photo trips, summer pack trips.
Choosing a Category on a New Offering
- Create the offering — Use Hunts → Create Hunt, or Create New Hunt inside Trip Builder. The first choice on the form is now the experience category.
- Pick the category that fits — Choosing Guided shows the guide ratio and per-ratio pricing, exactly as before. Every other category shows a single flat or per-person price field instead.
- Add your own wording if you want — The optional Display Label lets the offering show your words anywhere the category appears (see below).
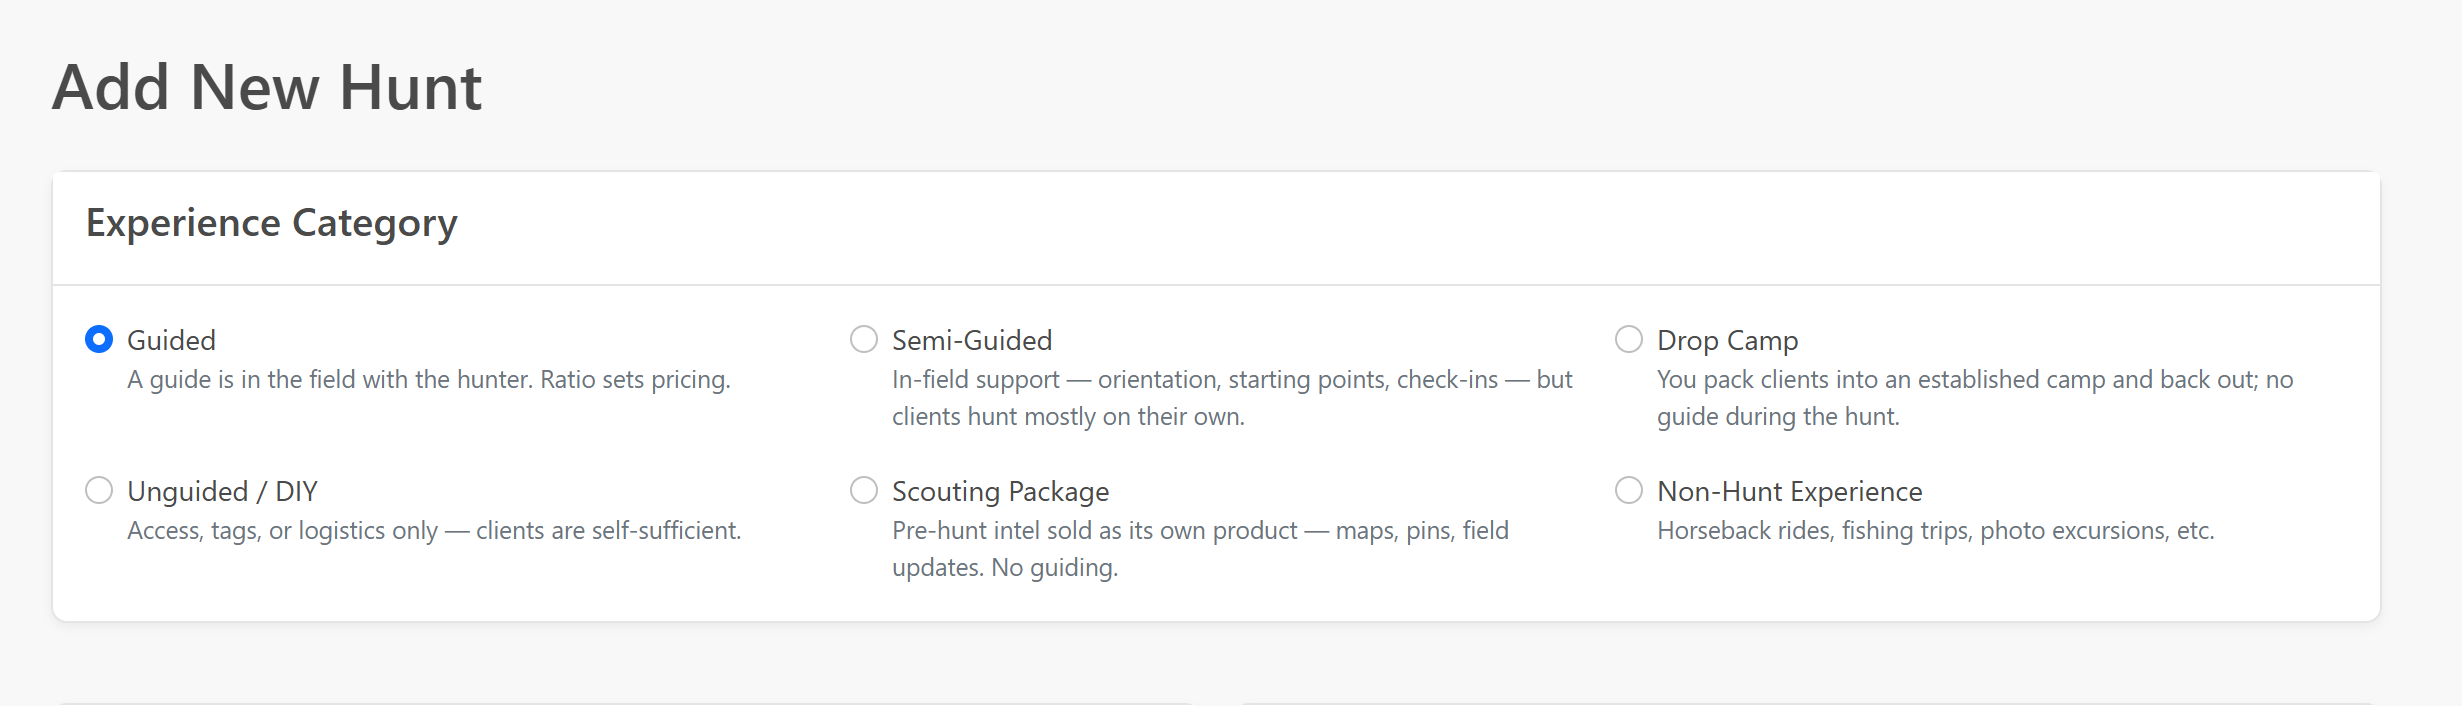
Your Words, Your Labels
No two outfits describe their trips the same way — one outfit's "drop camp" is another's "semi-guided." The category keeps your lists, filters, and reports organized, while the Display Label shows your wording on top of it. For example: an offering categorized Semi-Guided can display as "Minimal Guided" to your clients, and it still filters and reports as Semi-Guided. Leave the label blank and the standard category name is used.
Categorizing Your Existing Offerings
- Most offerings are already done — Your guided hunts (1×1, 2×1, 3×1) and drop camps were categorized automatically. Nothing to do.
- Look for the yellow "Set category" tag — Custom offerings need you to pick, because only you know whether "Bear Camp" is a DIY hunt or a drop camp. On Hunts → Available Hunts, any offering without a category shows a yellow Set category tag.
- Click it, pick, save — The tag opens the offering with the category choices ready. Pick one, save, and the tag disappears.
Where Categories Show Up
- Available Hunts — Each offering shows a color-coded category badge, and the new Experience filter narrows the list by category. The Guide Ratio filter now does exactly what it says.
- Availability Calendar — Offerings are tagged by category, with the same Experience filter.
- Public Trip Calendar (early access) — If the public calendar is enabled for your account, categories color-code it for your website visitors, with a legend and a filter so prospects can browse by trip type.
What Your Client Sees
Nothing changes on invoices, emails, or anything already booked. Categories organize your side of HuntDocs — until you put them to work on the public trip calendar, where they become the colors and filters your prospects browse by.
Important Notes
- Categories never change pricing. Guided offerings price by ratio exactly as before; every other category uses the single price field.
- New offerings require a category. Existing uncategorized offerings keep working as-is — you'll be asked to pick a category the next time you edit one.
- Changing an offering's category later doesn't touch existing bookings or invoices.
- The Display Label is optional everywhere. Use it when your vocabulary matters; skip it and the standard name is shown.
Online Booking: Sell Any Trip From a Public Link
Turn an offering into a bookable trip with its own public link. Customers pick the number of guests, pay a deposit or the full price by card or bank transfer, and HuntDocs creates the client, the booking, and the payment record for you. Online booking is now available for every experience category — Guided, Semi-Guided, Drop Camp, Unguided / DIY, Scouting, and Non-Hunt Experiences — not just custom experiences.
Turn On Online Booking for a Trip
- Open the offering — Create a new offering or edit an existing one from your hunt list.
- Find the Enable Online Booking switch — It sits at the bottom of the trip's details, no matter which experience category you picked.
- Flip it on — The Online Booking Settings section opens below it.
- Set the public details — Add a public title, description, and a photo for the booking page. Leave the title blank to use the trip's name.
- Choose how customers pay — Pick Full Payment (the whole price up front) or Deposit Only, then enter the deposit amount per guest. The balance shows as due before the trip.
- Attach documents (optional) — Select any waivers or forms to send automatically when a booking comes in.
- Save — A checkout link appears (https://yourname.myhuntdocs.com/book/…). Copy it onto your website, into an email, or wherever your prospects are.
Processing Fees at Checkout
If you've turned on payment-method processing fees in Settings, your public booking page now applies them the same way your invoices and deposit requests do — with no surprises for the customer:
- The customer chooses the method — Card or bank transfer (ACH), right on the booking page.
- The fee is shown before they pay — The page adds that method's fee as its own line and updates the total, so the amount they confirm is exactly what they're charged.
- Lower-fee options carry through — If your ACH fee is lower (or a flat amount), customers who pay by bank transfer see the smaller fee.
If you don't use payment-method fees, nothing changes — the booking page charges the price plus any applicable tax, with no added fee.
What Your Customer Sees
- A clean booking page — Your photo, the trip details, a guest count, and a clear total.
- Secure payment — Card or bank transfer through Stripe, for the deposit or full amount you set.
- An instant confirmation — A confirmation page and email with their booking details, the amount paid (including any processing fee), and any documents you chose to send.
What Happens After a Booking
- The client is created — A new client record (or a match to an existing one) with their contact info.
- The trip is booked — The hunt is assigned and the money is recorded as a deposit or payment, so your balances and calendar stay in sync.
- You're notified — A notification lands in HuntDocs so you know a new booking came in.
- Multiple guests — If someone books more than one spot, HuntDocs creates a group with the booker as the organizer and sends them an organizer link.
Important Notes
- Online booking requires a connected Stripe account — that's how payments are collected. Connect Stripe in Settings first.
- Calendar visibility and online booking are separate. A trip can appear on your public calendar without being bookable online, and the reverse.
- Set a capacity on the offering to control how many spots can be booked. Once it's full, the page offers a waitlist instead.
- Processing fees only appear when you've enabled them in Settings. They're applied at payment time, never baked into the trip price.
Book a Hunt or Trip (Trip Builder)
Trip Builder is the fastest way to book a client — add the client, the hunt, and every detail on one screen, then send a branded confirmation in a single click. It's the "Book A Hunt or Trip" tile on your dashboard. Most of the page is optional: add a client and a hunt and you can book in under a minute, then open any of the collapsible sections to add staff, documents, deposits, deadlines, and more.
The Quick Path: Book a Client in Under a Minute
- Open Trip Builder — From your Dashboard, find the Booking & Scheduling row and click "Book A Hunt or Trip."
- Add your client — In the Clients section, click Add Client, then search for an existing client or type in a new one (name, plus email and phone if you have them).
- Add the hunt — In the Hunts / Trips section, click Add Hunt. Pick a hunt you've already built, or click Create New Hunt to set one up right there (choose the experience category — Guided, Semi-Guided, Drop Camp, Unguided / DIY, Scouting Package, or Non-Hunt Experience — then species, dates, and price).
- Book & Send — Tick Send welcome email (and/or Send welcome text), add a personal note if you'd like, and click Book & Send. Your client gets a branded confirmation and the booking is live.
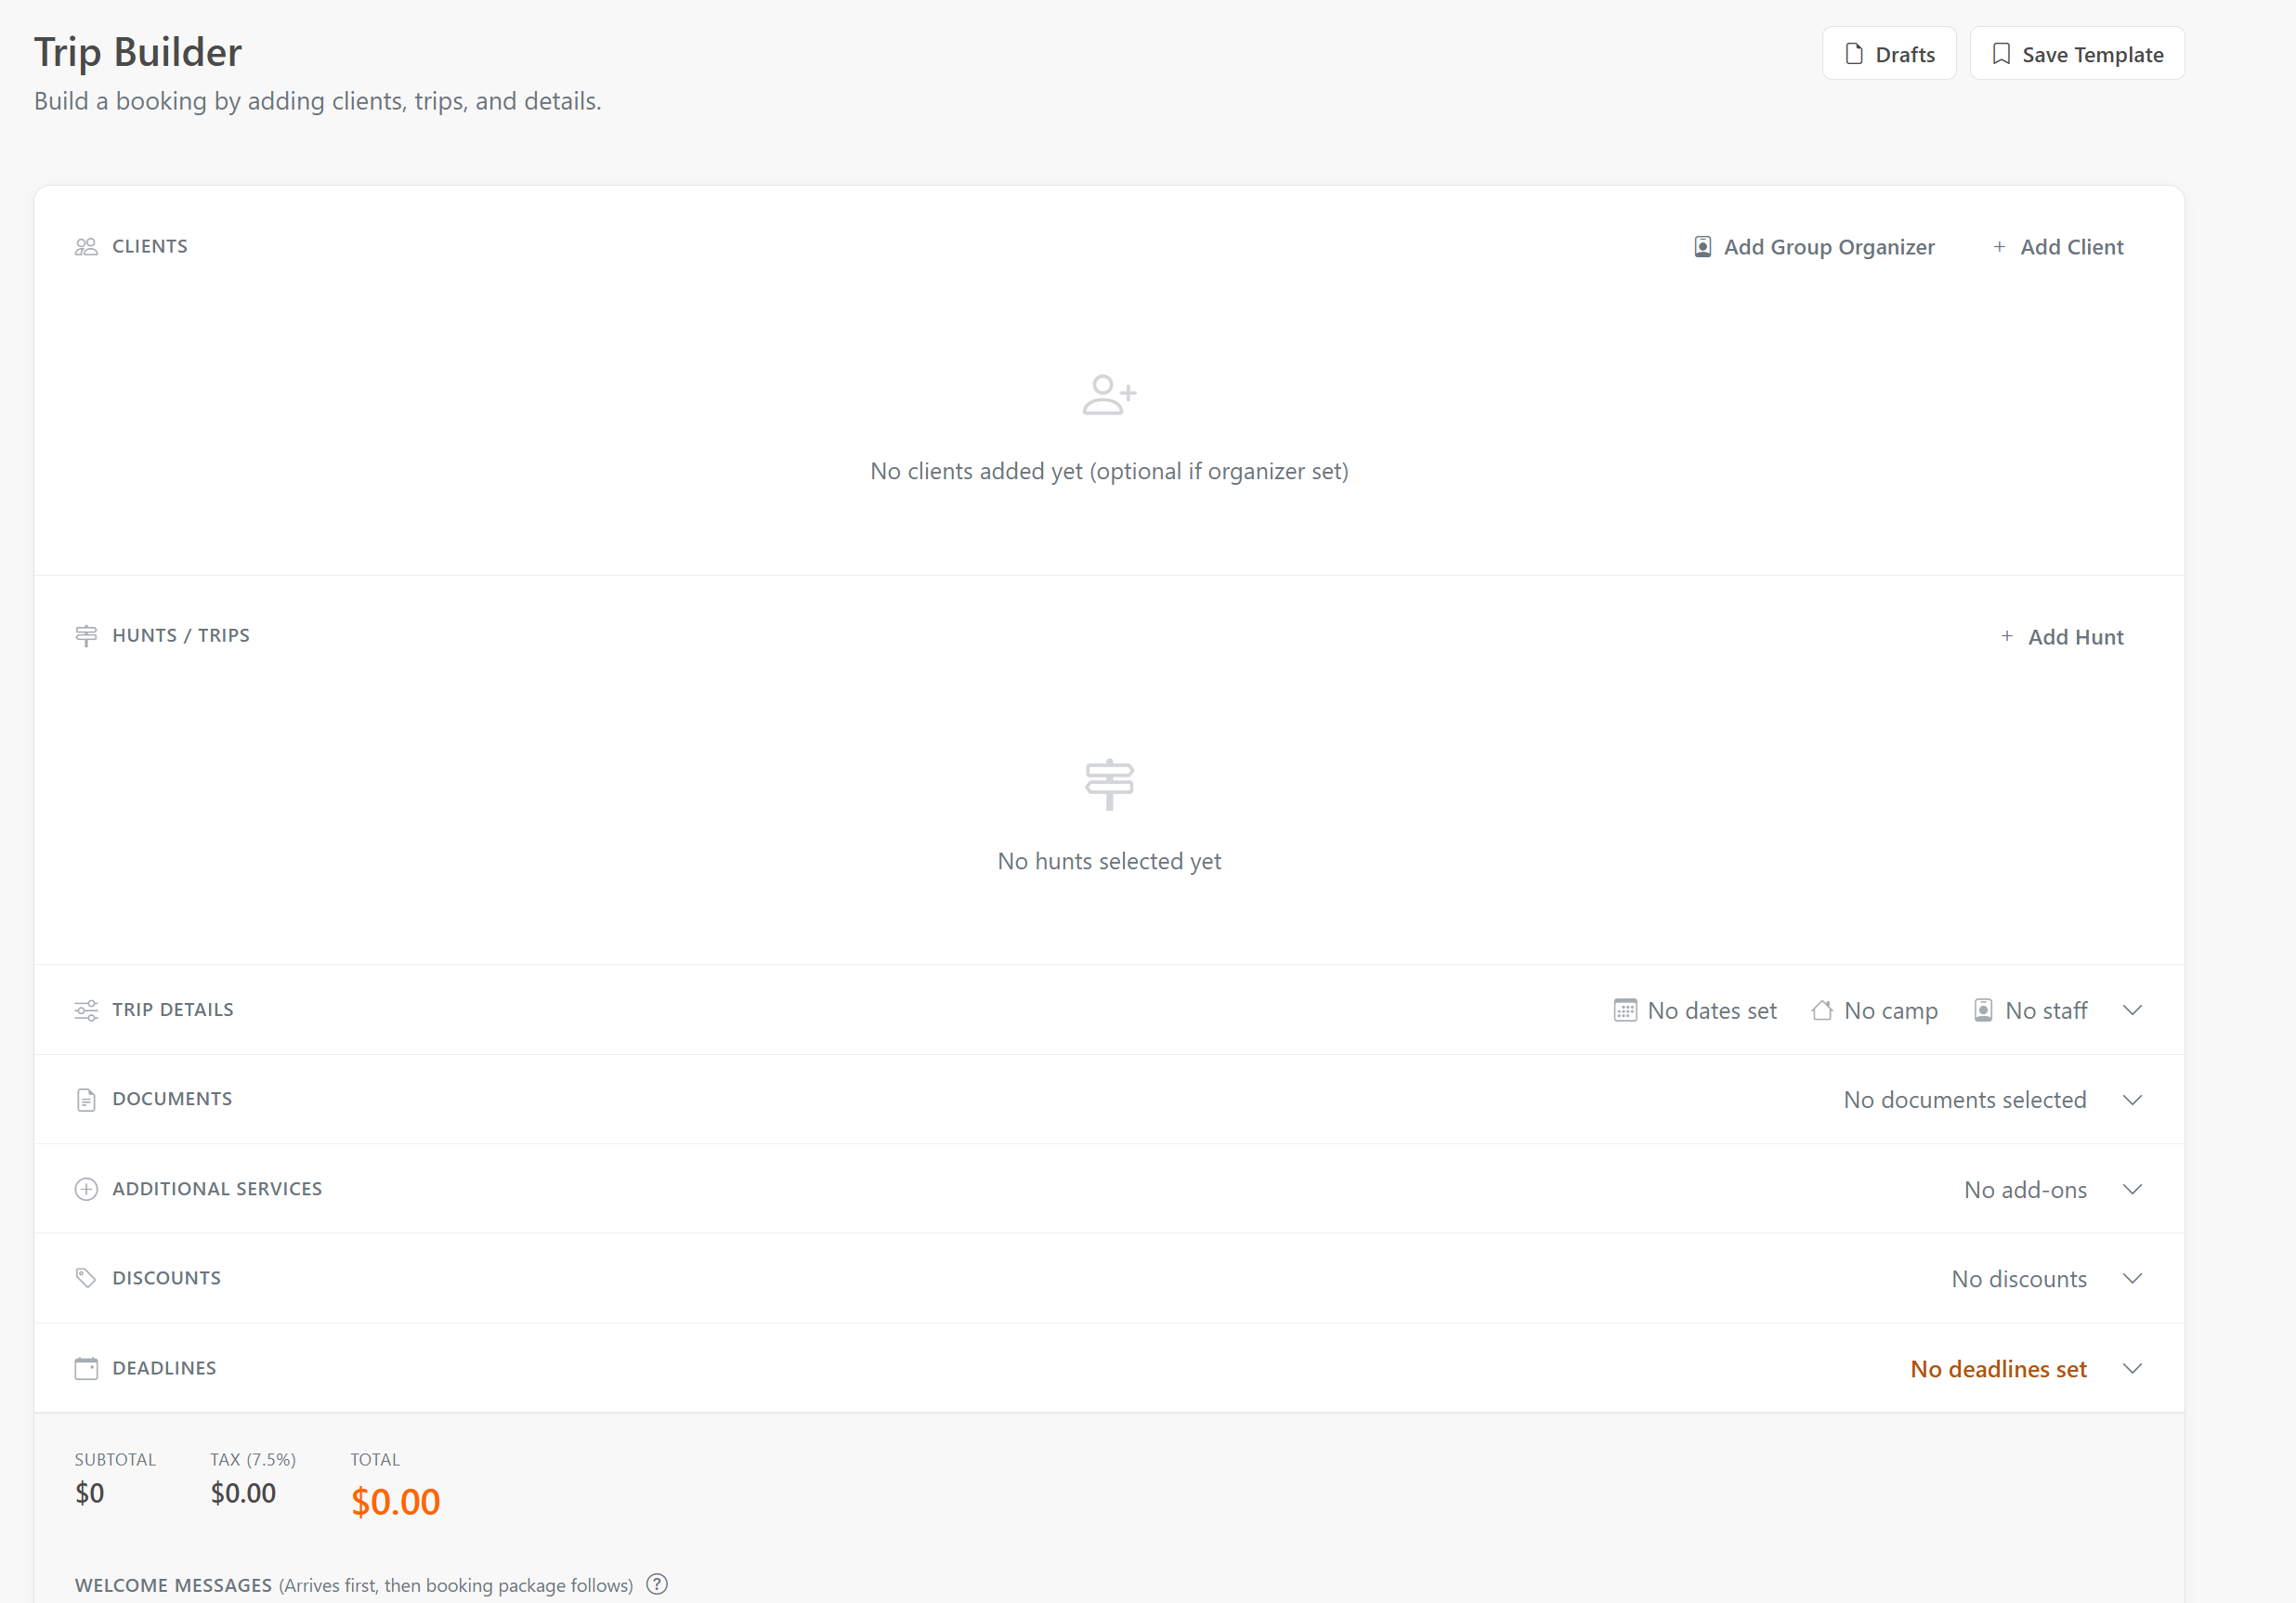
Trip Details
Open the Trip Details section to set everything about the trip itself:
- Dates — Set the Arrival Date, the Trip Dates (a start–end range), and the Departure Date.
- Weapon — Choose Rifle, Bow, Muzzleloader, Crossbow, or Shotgun.
- Camp — Assign a camp from your saved camps.
- Meeting Location & Time — Pick a saved meeting location (or click the + button to add a new one without leaving the page), then set the meeting date and time.
- Hunt Unit / GMU — Record the unit, e.g., "Unit 16B."
Assigning Staff
- Pick a staff member and role — In Trip Details under Assigned Staff, choose the person and a role (Guide, Manager, Spotter, Wrangler, Cook, Packer, or Camp Jack).
- Set their dates — Enter a start and end date for that staff member on this trip, then click Add.
- Watch for interest and conflicts — If staff expressed interest in this hunt, a highlighted notice shows who. An availability indicator warns you if the person is already booked elsewhere on those dates.
Documents
- Click Add Document — In the Documents section, attach the waivers, contracts, and SmartForms you want to send with this booking.
- Routing — For group bookings, each participant's documents can be routed to themselves, the organizer, or the group leader.
Additional Services & Discounts
- Add a service — In Additional Services, click Add Service for extras like a trophy fee, guest fee, or gear rental. Set the price, quantity or days, and how tax applies.
- Add a discount — In Discounts, click Add Discount. Choose a fixed amount or a percentage, and apply it to a specific hunt, a specific service, or the whole invoice.
Deadlines & Payment Schedule
- Deposit Due — The date you want the deposit (or full payment) in to hold the spot. Shown in the booking email.
- Documents Due — When signed documents are due. Reminders send automatically as the date approaches.
- Final Payment Due — When the balance is due. Shown on the invoice; a reminder sends 30 days before.
- Scheduled Payment (optional) — An optional mid-point payment between the deposit and the final balance — set an amount and its own due date.
Deposit & Payment Options
- Set the deposit — In the totals footer, choose a deposit as a percentage or a fixed dollar amount. The deposit total updates as you go.
- Payment methods — If you've enabled processing fees in Settings, the footer shows credit card, bank transfer (ACH), and check/cash options with the exact amounts. Tick the credit-card fee when quoting a client who plans to pay by card.
- Deposits on File — If the client already has an unallocated deposit, a Deposits on File section appears so you can apply it to this booking. Unselected deposits stay on file.
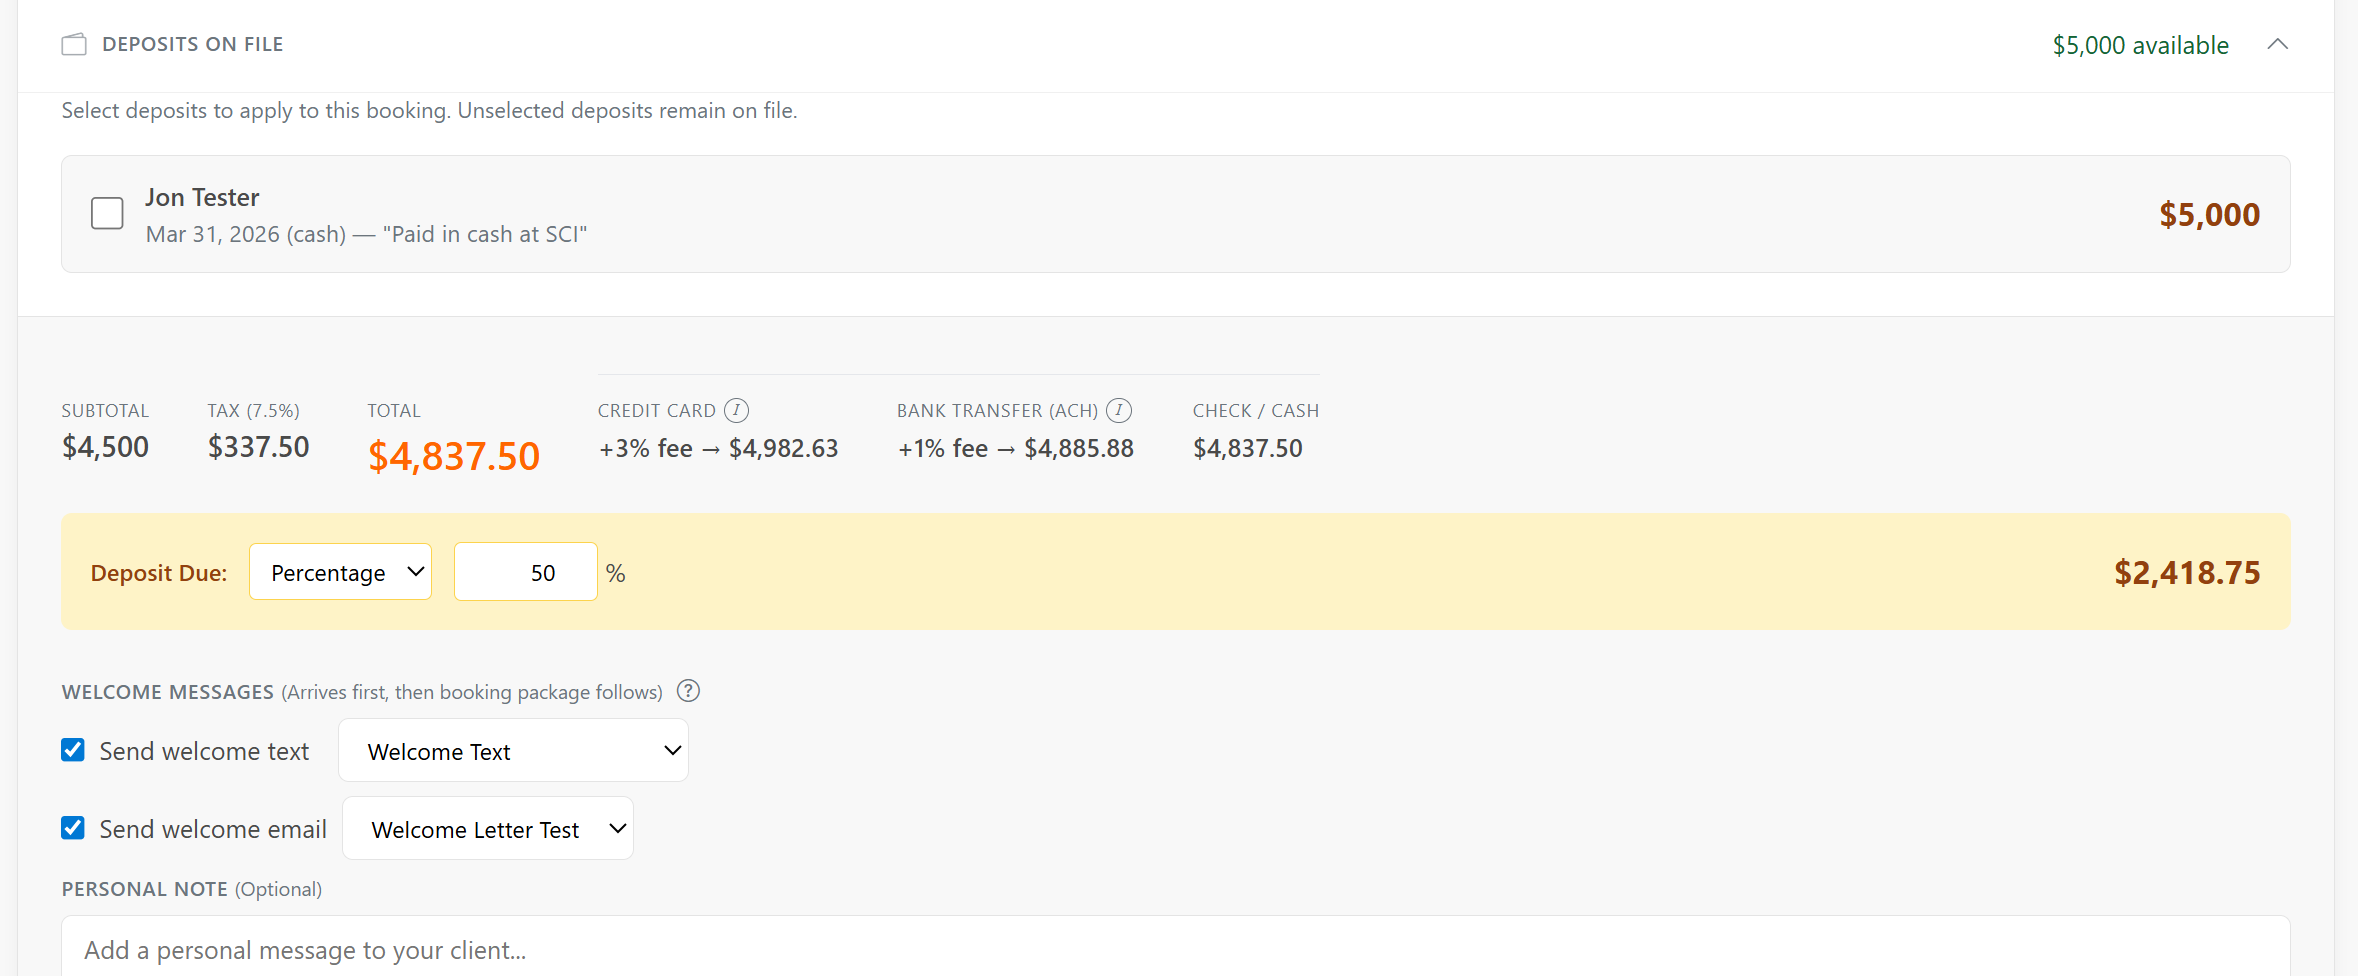
Welcome Messages & Personal Note
- Welcome text / email — Below the totals, tick Send welcome text and/or Send welcome email and pick a template (your defaults are pre-selected). These arrive first, just before the booking package. (Manage templates under Communications → SMS Templates / Email Templates.)
- Personal Note — Add an optional note that appears at the top of the booking email when you use Book & Send.
Booking a Group or Party
- Add an organizer — Click Add Group Organizer to set the person coordinating the trip. They can receive invoices and track everyone's documents through their own portal.
- Add each client — Use Add Client for every participant in the party. They can share the same hunt, camp, and dates.
- One group invoice — Book & Send creates a single group invoice for the party. (To add non-hunting companions, see the "Adding Observers" topic.)
- Multiple brands? — If you run more than one business identity, use the Sending as selector at the top to choose which brand's name and logo appear on the booking.
Drafts & Templates
- Drafts save automatically — A "Draft saved" indicator confirms your work is kept. Use the Drafts button at the top to reopen one and finish later.
- Save a template — Click Save Template to store a common trip setup and reuse it for future bookings.
Finishing the Booking
- Book & Send — Books the trip and sends the welcome messages plus the branded booking package to your client.
- Book & View Client — Books without sending anything, then takes you to the client's page.
- Book + New Trip — Books without sending and clears the screen so you can book the next one.
What Your Client Sees
- A branded confirmation email — With your name and logo, the hunt and trip details, any payment link and deposit terms, and links to sign any documents you attached.
- A welcome text (optional) — If you turned on the welcome text and the client is opted in, a short SMS arrives first to set the tone.
- Payment choices — If processing fees are enabled, the invoice shows their payment options (card, ACH, or check/cash) with the exact amount for each.
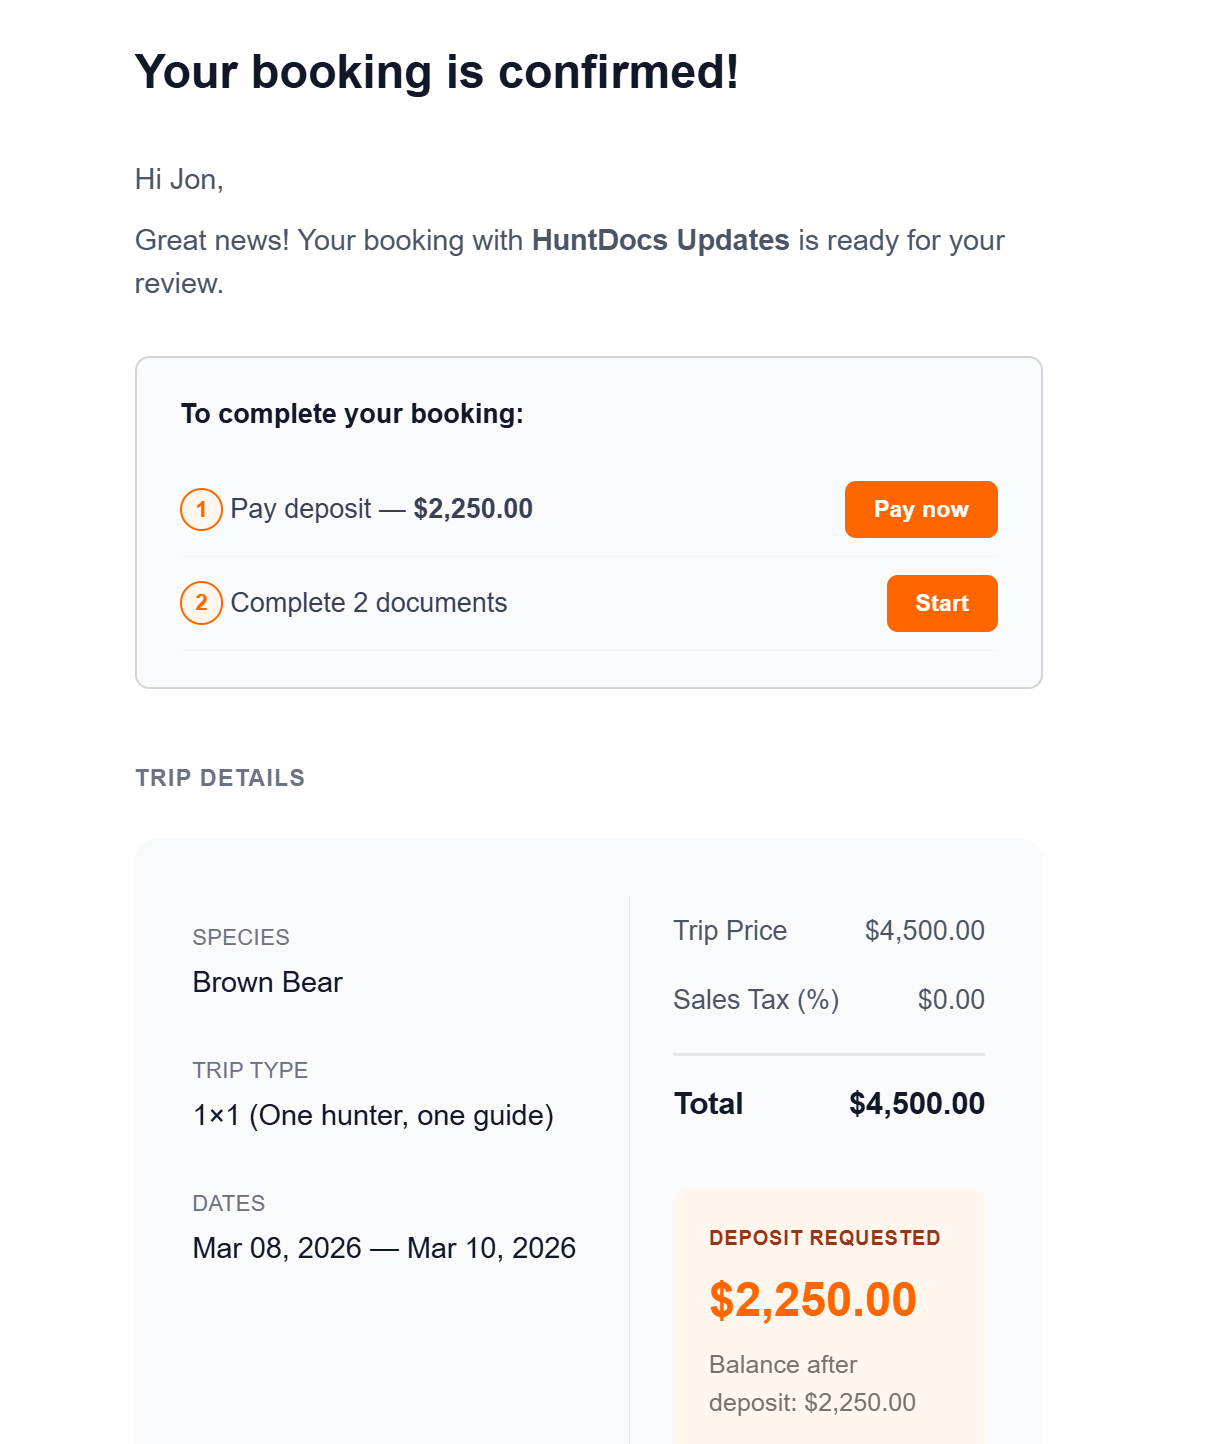
Important Notes
- Add your species first — To build a hunt (here or under Hunts → Create Hunt), you need at least one species turned on in your Settings, or the species list will be empty.
- Only Book & Send sends — Book & View Client and Book + New Trip save the booking without emailing or texting the client.
- Welcome text needs a phone number and consent — A welcome SMS only sends if the client has a mobile number on file and has given SMS consent; otherwise the checkbox is disabled with a reason.
- Group welcome messages go to the organizer — On a group booking, the welcome text and email go to the organizer.
- Capacity is enforced — A hunt won't let you book past its available slots, so you can't accidentally overbook.
- Most sections are optional — Trip Details, Documents, Services, Discounts, Deadlines, and Deposits on File all stay collapsed until you need them. A client and a hunt are all you need to book.
Question about your specific account?
Some answers need your account in front of us — payments, message delivery, or Stripe and QuickBooks status. Email [email protected] and we’ll take a look.